from beginning to end!"Project: Big Nell"(11/1/07)
Moderator: FORDification
- rjewkes
- 100% FORDified!

- Posts: 3711
- Joined: Sun Apr 17, 2005 1:09 am
- Location: Missouri, Webb City
- Contact:
some shows are happy to see WIP's (Works In Progress) they have awards at some for partialy restoreds. just get her runnin and the front sheet on and she'll be good for the show.
"It is better to keep your mouth shut and appear stupid than to open it and remove all doubt." - Mark Twain
'70 f250 4x4 Crew cab 460/C6 '72 F100 390/C6 9.8 MPG AVG. '89 Mercury Cougar LS Dual Exh. V6 . 18.9 MPG AVG. In Town.

I don't want to give em a heart-attack. That is what would happen if I answered the door in the buff. Heck it almost scares me to death when I step out of the shower and look in the mirror.~Mancar1~
fuelly.com
'70 f250 4x4 Crew cab 460/C6 '72 F100 390/C6 9.8 MPG AVG. '89 Mercury Cougar LS Dual Exh. V6 . 18.9 MPG AVG. In Town.

I don't want to give em a heart-attack. That is what would happen if I answered the door in the buff. Heck it almost scares me to death when I step out of the shower and look in the mirror.~Mancar1~
fuelly.com
-
layedout72
- Blue Oval Guru

- Posts: 1280
- Joined: Fri Apr 21, 2006 5:11 pm
- Location: Mississippi, Hattiesburg
re: from beginning to end! (updated 5/27)
thats the plan. its not a hotrod/resto show, but more of a minitruck show. either way, it will hopefully be AT LEAST on the coast, not necessarily in the show.
-
layedout72
- Blue Oval Guru

- Posts: 1280
- Joined: Fri Apr 21, 2006 5:11 pm
- Location: Mississippi, Hattiesburg
re: from beginning to end! (updated 5/27)
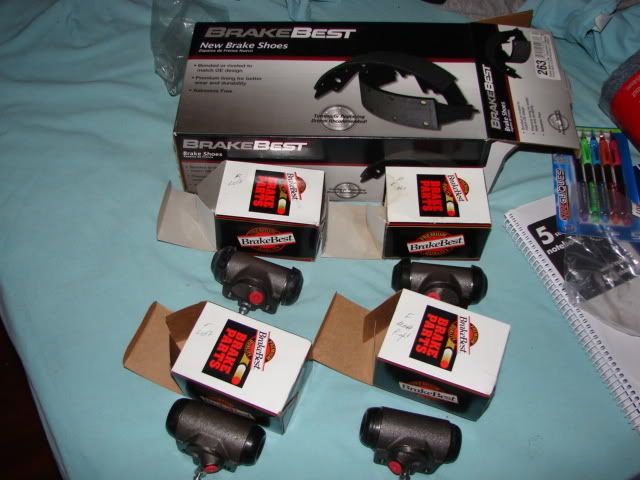
time to stop! well, time to make the truck stop anyways. Got 4 brand spankin new wheel cylinders, and rear shoes. They had to order the front ones. Should be here by the end of the week. They said they would call me. Tomorrow (depending on homework, and me understanding calculus) I will get to gettin, and hopefully have all this stuff on the truck.


- RebelRider
- Preferred User

- Posts: 295
- Joined: Fri Feb 09, 2007 7:16 pm
- Location: Missouri, Monett
re: from beginning to end! (updated 5/27)
You're gettin there! Keep up the good work!
And thanks for keepin the pics goin!
And thanks for keepin the pics goin!
-
layedout72
- Blue Oval Guru

- Posts: 1280
- Joined: Fri Apr 21, 2006 5:11 pm
- Location: Mississippi, Hattiesburg
re: from beginning to end! (updated 5/27)
well, i have set a goal for this weekend. get the headers cleaned/painted/installed, and get the inner fenders painted and installed. I have 2.5 weeks to get it running and driving. Oh, also this weekend, the brakes WILL be done. One way or another. So, a full Friday afternoon, and Saturday should be able to get that done. Once that is done, I will get started on patching the wiring back together.
-
layedout72
- Blue Oval Guru

- Posts: 1280
- Joined: Fri Apr 21, 2006 5:11 pm
- Location: Mississippi, Hattiesburg
re: from beginning to end! (updated 7/7)
thing tend to not go as planned, but we all know that it can make for fun times. i didnt get the truck running yet, but so be it. i dont feel like rushing or even busting my butt on it right now. I will get it done though. I hope to have it sitting on all 4 this week, at least.
I went to the truck show, and had an absolute blast. I went to another one this past month, couple weeks ago i think, and it was about the best time i have had in my time yet. It was pure insanity all weekend. Just how I like it. booze, trucks, girls, draggin, and more girls.
that being said, i am still working on the brakes, no big deal as i said, im in no real rush. I have a cruise in the beginning of august, so my money is tied up for the most part. i will have pics soon as possible of what is done. the inner fenders are painted, cleaned the exhaust manifolds up a bit, didnt do much though. They are on as well though. I need to redo the front brake I have already done, he rigged it to work with what he had, just like many other areas with this truck.
I plan to get some steel tomorrow and have it cut how i need it. Where should I look to have it cut, and do people even do this? I don't know what to use to cut 1/4 inch material, but I do know I don't have it haha. Thinking a band saw is needed. Either way, that should be done monday, as well as getting atleast the hubs and lugs pressed in to the drum. I still need to figure the bearings and all.
Can you do them without a press? More worried about the rear bearing/seal combo. I think it's the race bearing? Can I do that myself? The wheel bearing shouldn't be a big deal, least I hope not.
- customcrewcab
- Blue Oval Fanatic

- Posts: 830
- Joined: Wed Feb 02, 2005 6:43 pm
- Location: Queen Creek Arizona
- Contact:
re: from beginning to end! (updated 5/27)
this is what shops use http://www.harborfreight.com/cpi/ctaf/d ... mber=93507
i am guessing your talking about your new frame. your also going to need smaller bracing so you hold it straight. it will move alot when you start burning it in. also on you pic where you have the crossmember sunk into the frame. your best bet is a large upright bandsaw or on a mill. a end mill will keep the angles straight and clean. bigger gaps there more it and moved and be off. i would mark it out on the floor on the garage with marker and weld it up there. if i where you i would just has a waterjet cut the holes and angles in the crossmember. should not cost that much.
i am guessing your talking about your new frame. your also going to need smaller bracing so you hold it straight. it will move alot when you start burning it in. also on you pic where you have the crossmember sunk into the frame. your best bet is a large upright bandsaw or on a mill. a end mill will keep the angles straight and clean. bigger gaps there more it and moved and be off. i would mark it out on the floor on the garage with marker and weld it up there. if i where you i would just has a waterjet cut the holes and angles in the crossmember. should not cost that much.
http://www.fordification.com/galleries/ ... ?cat=10106

if theres a new way, i'll be the first in line. it better work this time
1970 crewcab 393w afr heads, 6 speed, turbocharged, 6 piston calipers 13" rotors on all 4 corners

if theres a new way, i'll be the first in line. it better work this time
1970 crewcab 393w afr heads, 6 speed, turbocharged, 6 piston calipers 13" rotors on all 4 corners
-
layedout72
- Blue Oval Guru

- Posts: 1280
- Joined: Fri Apr 21, 2006 5:11 pm
- Location: Mississippi, Hattiesburg
re: from beginning to end! (updated 5/27)
oops, you said water jet. my fault. what kind of places should I be looking at for that type of service? I am not sure what the local metal supplier can do for me, never been there.
Also, is it able to be cut for the holes after the crossmember has been built? Reason I ask is because the hold for the arm's barely goes in at the weld. It crosses over into it just slightly. I might be able to pull it back just a bit, maybe an 1/8 inch if thats going to be a problem, but I would like to keep it at the specs Marz has provided for me.
As for the welding, I plan to tack it up with just flux core, but I will be getting argon shortly there after my cruise in August. I will also be beveling all joining areas so that I can weld them with more surface area, and grind down the final welds for a good appearance.
- wt4speed#2
- Blue Oval Guru

- Posts: 1064
- Joined: Fri Mar 25, 2005 9:21 pm
- Location: Texas, Ft. Worth
- customcrewcab
- Blue Oval Fanatic

- Posts: 830
- Joined: Wed Feb 02, 2005 6:43 pm
- Location: Queen Creek Arizona
- Contact:
re: from beginning to end! (updated 5/27)
yea its around 10 bucks a cut here. you will still have to take the crossmember to another place. my buddy has a shop with a horizantial bandsaw and big upright. mill, lathe, tig, mig, english wheel, tubbing bender. you might want to find a local shop and see what they have. you could learn alot there.
http://www.fordification.com/galleries/ ... ?cat=10106

if theres a new way, i'll be the first in line. it better work this time
1970 crewcab 393w afr heads, 6 speed, turbocharged, 6 piston calipers 13" rotors on all 4 corners

if theres a new way, i'll be the first in line. it better work this time
1970 crewcab 393w afr heads, 6 speed, turbocharged, 6 piston calipers 13" rotors on all 4 corners
-
layedout72
- Blue Oval Guru

- Posts: 1280
- Joined: Fri Apr 21, 2006 5:11 pm
- Location: Mississippi, Hattiesburg
re: from beginning to end! (updated 5/27)
I will tool around this week seeing what I can find shop wise, and supplier wise. I really haven't looked yet.
-
layedout72
- Blue Oval Guru

- Posts: 1280
- Joined: Fri Apr 21, 2006 5:11 pm
- Location: Mississippi, Hattiesburg
re: from beginning to end! (updated 5/27)
well, i was referring to the project as "Project: Big Bertha" because everyone said the truck looks like the fat ugly step sister on the mothers side LOL, but I think I will change it to "Project: Spare Change" or "Project: Penny Pincher" because that seems to fit more haha. Anyone else got some ideas? I want it to say that im trying to build a nice ride on a budget.
maybe "Project: Beginners Luck" would be the best fit!
maybe "Project: Beginners Luck" would be the best fit!
-
layedout72
- Blue Oval Guru

- Posts: 1280
- Joined: Fri Apr 21, 2006 5:11 pm
- Location: Mississippi, Hattiesburg
re: from beginning to end! (updated 5/27)
well i believe i figured it out. my grandmother is always tellin people about my truck and how much i work on it and all this. she loves hearing about it, and thinks its just the coolest thing in the world that im building it. shes the person that if we messed up she would talk bad about us for a few days and fall head over heels into trying to help us get back. always saying good things about us, to everyone, to her we can do no wrong. So this kind of gives the project it's name. Not so much it being a "dedication" to it, but it is what it is. Shes proud of what we do, and I feel it makes a good name for the truck.
So, the name of the project is officially "Project: Big Nell" that's her nick name, her name to us us Mamaw, but her real name is Nell. Shes the tiniest thing weighing only a 100 pounds so Big Nell fits her just perfect. Doesn't make sense? Meet her and it would.
So, the name of the project is officially "Project: Big Nell" that's her nick name, her name to us us Mamaw, but her real name is Nell. Shes the tiniest thing weighing only a 100 pounds so Big Nell fits her just perfect. Doesn't make sense? Meet her and it would.
-
layedout72
- Blue Oval Guru

- Posts: 1280
- Joined: Fri Apr 21, 2006 5:11 pm
- Location: Mississippi, Hattiesburg
re: from beginning to end! (7/9/07) "Project: Big Nell&

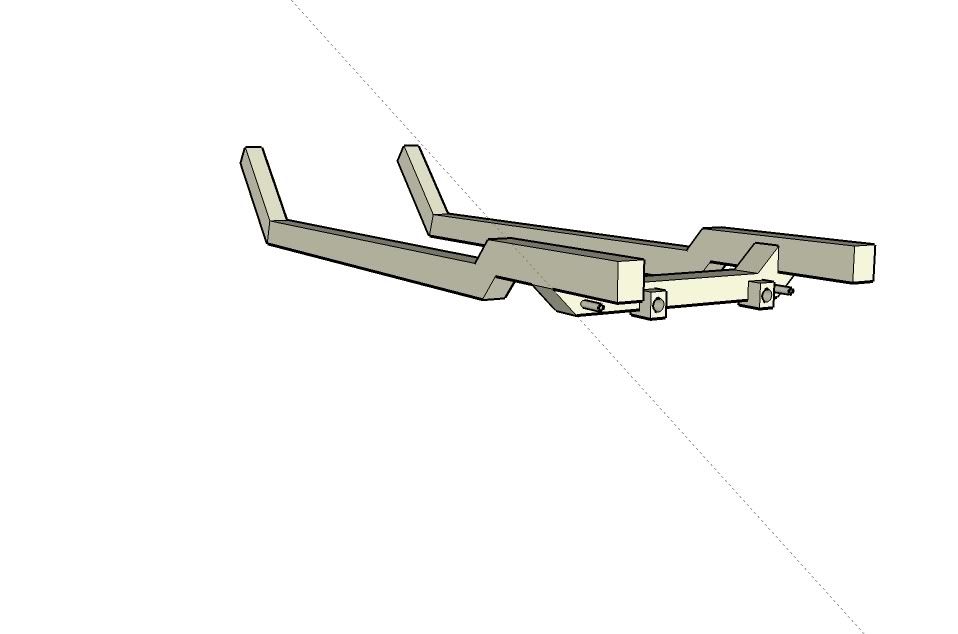
thats just a rough cut of the frame, not to spec really. other than the width and arm mounts and placement for the steering mounts, its not really to spec. the holes and all i mean

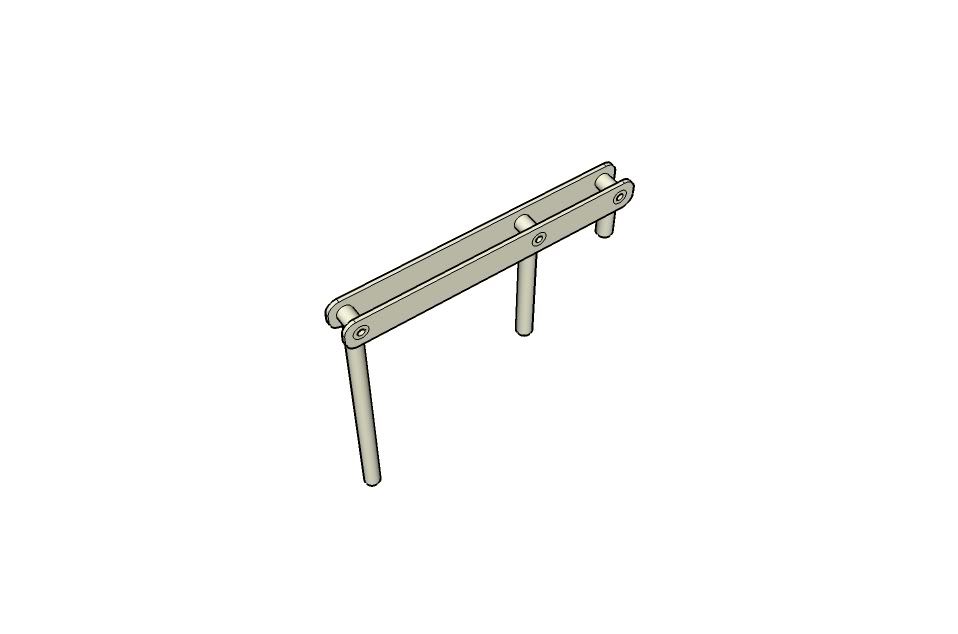
this is the cantiliever that will be up front parrallel to the frame rail. on the out side. the short side will be the bag side, closest to the firewall. the middle will be the pivot point, and the other end will be where the truck is lifted from really. it will go through the upper arm and mount to the lower arm. so when i inflate the bag, the lever pivots and pushes the long rod, pushing against the lower arm, and lifting the frame. it shouldnt hurt performance because its really all the same as a normal bag setup, just stretched a bit. oh its a 2:1 ratio lever so a bag with 9 inches of lift should get around 18 given the balljoints dont bind. also, it would probably be fine like it is, but it will be fully boxed in wherever possible, and completely sealed so it doesnt hold water, or let any in. will be powder coated or chromed and engraved saying the project name. "Big Nell" in a Script font.
- marz68
- Blue Oval Guru

- Posts: 1387
- Joined: Sat Dec 03, 2005 2:25 am
- Location: California, Northridge
- Contact:


