Project "Uncle Fester"- 9/21 Interior almost finished
Moderator: FORDification
- 72stepside
- Blue Oval Fan

- Posts: 537
- Joined: Tue May 09, 2006 10:31 pm
- Location: Florida, Milton
- Contact:
I'm NOT kidding about being careful with it. I don't want to hear about how it attacked you!!!!1971ford wrote:ive been using a flat one and thought it was magical!
ill get one of those fancy ones this weekend! thanks!
Chris
72 F100 Stepside w/ 78 300 CID
Hedman Headers
Disc Brakes
Power Steering with 3 STILL on the tree
Comfy Crown Vic Seats
71 F250 PS, PB, AC, Auto, 390
Loooong way to go on this one!


72 F100 Stepside w/ 78 300 CID
Hedman Headers
Disc Brakes
Power Steering with 3 STILL on the tree
Comfy Crown Vic Seats
71 F250 PS, PB, AC, Auto, 390
Loooong way to go on this one!


- 72stepside
- Blue Oval Fan

- Posts: 537
- Joined: Tue May 09, 2006 10:31 pm
- Location: Florida, Milton
- Contact:
re: Project "Uncle Fester"-quick update 2/6/2008
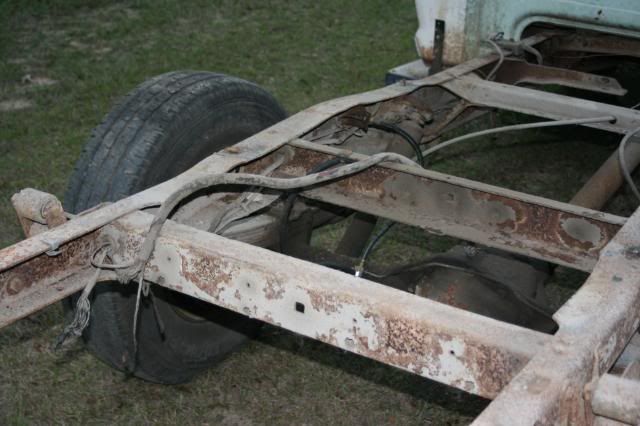
Allright, I got some things done over the weekend. I got the flexomatic shackles cleaned and POR15-ed. I got the back half of the frame under the bed cleaned and POR15-ed. I finished that up tonight.
BEFORE any cleaning
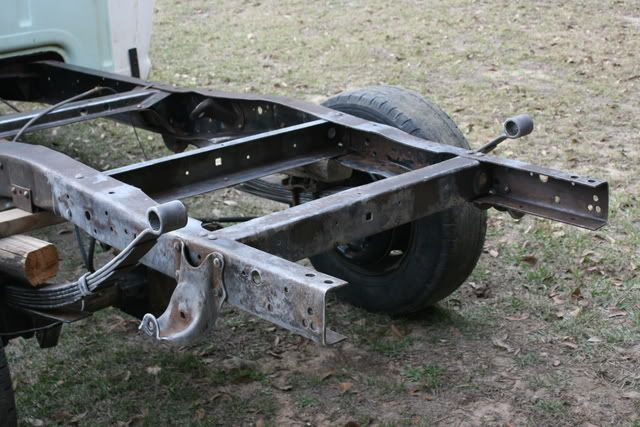
AFTER pressure washing, extensive wire brushing, degreasing with Marine Clean, and washing with Metal Prep (hence the white coating)
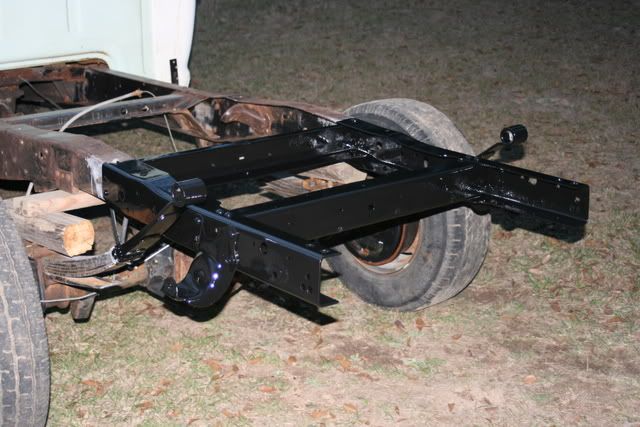
And FINALLY, with one coat of POR-15 (the 2nd coat was put on 3 hours later)
I would have got the POR-15 applied yesterday but I found a crack in the rear spring hanger on the drivers side. I figured this would be as good a time as any to try my hand at welding. I cleaned it up real good and got a groove filed in the crack to fill. I got a bead on there, ground it flush, then beat on it with a hammer. It didn't break loose so I guess it will hold.
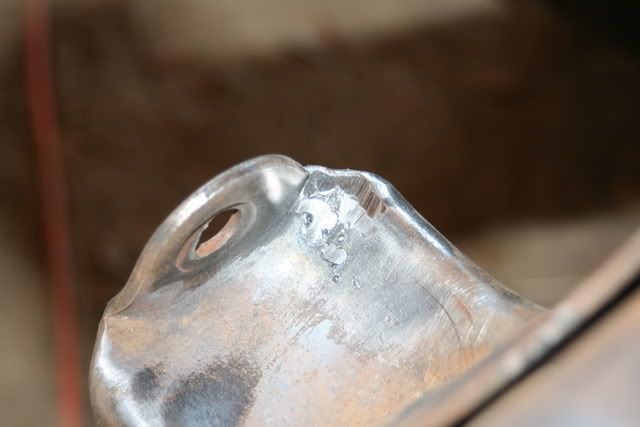
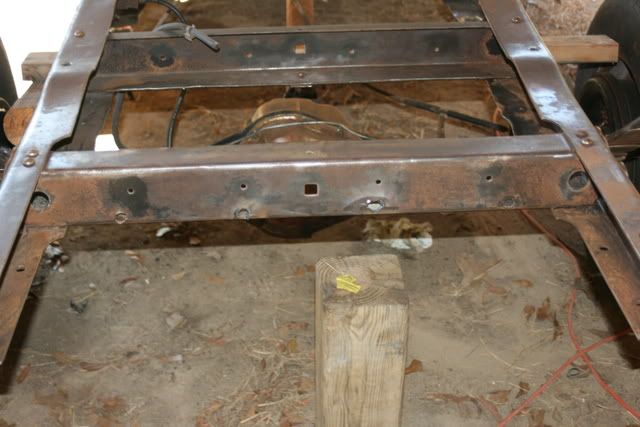
I had never stick welded before then. I practiced on 4 holes that were burned into the rear cross member by the previous owner. Not such a good job on patching them up, but it is better than it was. Below is a before pic. I guess I didn't take an after. Sorry about that.
I'm real impressed with the POR-15. I've been brushing it on. It has very noticeable brush strokes at application, but it really flattens out nicely once it starts to set up. I got some on my neck that won't come off. It'll have to wear off. Fortunately it's a little spot. Nothing too noticeable.
I should get to put the bushings in and get the rear portion of the rear springs attached to the frame again in the next day or so. I'll get the front apart, cleaned, POR-15ed and back together early next week.
Oh, by the way, the Van Halen concert last Friday night in New Orleans was OUTSTANDING!!!!
BEFORE any cleaning

AFTER pressure washing, extensive wire brushing, degreasing with Marine Clean, and washing with Metal Prep (hence the white coating)

And FINALLY, with one coat of POR-15 (the 2nd coat was put on 3 hours later)

I would have got the POR-15 applied yesterday but I found a crack in the rear spring hanger on the drivers side. I figured this would be as good a time as any to try my hand at welding. I cleaned it up real good and got a groove filed in the crack to fill. I got a bead on there, ground it flush, then beat on it with a hammer. It didn't break loose so I guess it will hold.

I had never stick welded before then. I practiced on 4 holes that were burned into the rear cross member by the previous owner. Not such a good job on patching them up, but it is better than it was. Below is a before pic. I guess I didn't take an after. Sorry about that.

I'm real impressed with the POR-15. I've been brushing it on. It has very noticeable brush strokes at application, but it really flattens out nicely once it starts to set up. I got some on my neck that won't come off. It'll have to wear off. Fortunately it's a little spot. Nothing too noticeable.
I should get to put the bushings in and get the rear portion of the rear springs attached to the frame again in the next day or so. I'll get the front apart, cleaned, POR-15ed and back together early next week.
Oh, by the way, the Van Halen concert last Friday night in New Orleans was OUTSTANDING!!!!
Chris
72 F100 Stepside w/ 78 300 CID
Hedman Headers
Disc Brakes
Power Steering with 3 STILL on the tree
Comfy Crown Vic Seats
71 F250 PS, PB, AC, Auto, 390
Loooong way to go on this one!


72 F100 Stepside w/ 78 300 CID
Hedman Headers
Disc Brakes
Power Steering with 3 STILL on the tree
Comfy Crown Vic Seats
71 F250 PS, PB, AC, Auto, 390
Loooong way to go on this one!


-
mljjones67
- Blue Oval Guru

- Posts: 1341
- Joined: Sun Aug 06, 2006 5:41 pm
- Location: Utah, Springville
- Contact:
- JWW
- Blue Oval Fanatic

- Posts: 793
- Joined: Wed Apr 11, 2007 7:57 pm
- Location: Tennessee
re: Project "Uncle Fester"-POR15 applied 2/11/2008
Wow! Great progress. Your posts are very helpful to me. I'll be getting one of those wire wheels.
JWW
1967 F100 Ranger, Auto, 240ci
2004 F150 Crew Cab
My project: http://www.fordification.com/forum/view ... &sk=t&sd=a
1967 F100 Ranger, Auto, 240ci
2004 F150 Crew Cab
My project: http://www.fordification.com/forum/view ... &sk=t&sd=a
- kilog55
- Preferred User

- Posts: 399
- Joined: Sun Feb 10, 2008 1:07 pm
- Location: Lenoxville, Pennsyltucky
yeah por-15 is awesome at self leveling but man is it pricey. when you done with the frame and whatever else would you mid posting how much you used as i only have 3/4 of a Qt left and would like to know if i should get a quart or a gallon or what
1968 F250 Ranger 2wd 472ci TH400 Caddy powered.
1979 F250 Ranger 4X4 400ci T18
anyone need a 60x24x24 flatbed semi toolbox?
my gallery - http://www.fordification.com/galleries/ ... ?cat=10437
1979 F250 Ranger 4X4 400ci T18
anyone need a 60x24x24 flatbed semi toolbox?
my gallery - http://www.fordification.com/galleries/ ... ?cat=10437
- 72stepside
- Blue Oval Fan

- Posts: 537
- Joined: Tue May 09, 2006 10:31 pm
- Location: Florida, Milton
- Contact:
I'd be glad to. I bought two quarts to keep from letting a gallon go bad. So far so good. It goes on real thin. It looks like a little will go a long way.kilog55 wrote:yeah por-15 is awesome at self leveling but man is it pricey. when you done with the frame and whatever else would you mind posting how much you used as i only have 3/4 of a Qt left and would like to know if i should get a quart or a gallon or what
Chris
72 F100 Stepside w/ 78 300 CID
Hedman Headers
Disc Brakes
Power Steering with 3 STILL on the tree
Comfy Crown Vic Seats
71 F250 PS, PB, AC, Auto, 390
Loooong way to go on this one!


72 F100 Stepside w/ 78 300 CID
Hedman Headers
Disc Brakes
Power Steering with 3 STILL on the tree
Comfy Crown Vic Seats
71 F250 PS, PB, AC, Auto, 390
Loooong way to go on this one!


- kilog55
- Preferred User

- Posts: 399
- Joined: Sun Feb 10, 2008 1:07 pm
- Location: Lenoxville, Pennsyltucky
awesome thanks man not sure if it goes bad if you seal it properly. ive had a quart for almost 10 years and it is still like it was on day one. but i should ask the guy who make it if it works as well as a new can. cause ya figure they dont sell out then make more.
but i have it sealed with saran wrap under the lid.
but i have it sealed with saran wrap under the lid.
1968 F250 Ranger 2wd 472ci TH400 Caddy powered.
1979 F250 Ranger 4X4 400ci T18
anyone need a 60x24x24 flatbed semi toolbox?
my gallery - http://www.fordification.com/galleries/ ... ?cat=10437
1979 F250 Ranger 4X4 400ci T18
anyone need a 60x24x24 flatbed semi toolbox?
my gallery - http://www.fordification.com/galleries/ ... ?cat=10437
- 69bumptruck
- Preferred User

- Posts: 269
- Joined: Tue Jan 30, 2007 10:02 pm
- Location: Moore, Oklahoma
- Contact:
Re: re: Project "Uncle Fester"-quick update 2/6/20
Man, that looks good!!! What did you brush it on with? I would've guessed you sprayed it.72stepside wrote:AFTER pressure washing, extensive wire brushing, degreasing with Marine Clean, and washing with Metal Prep (hence the white coating)
And FINALLY, with one coat of POR-15 (the 2nd coat was put on 3 hours later)
I'm real impressed with the POR-15. I've been brushing it on. It has very noticeable brush strokes at application, but it really flattens out nicely once it starts to set up.
- 72stepside
- Blue Oval Fan

- Posts: 537
- Joined: Tue May 09, 2006 10:31 pm
- Location: Florida, Milton
- Contact:
re: Project "Uncle Fester"-POR15 applied 2/11/2008
I've already decided that everything under the truck will have POR-15 on it. If I'm gonna go through all this aggravation, I mean joy and fun, I'm gonna seal it up right.
Chris
72 F100 Stepside w/ 78 300 CID
Hedman Headers
Disc Brakes
Power Steering with 3 STILL on the tree
Comfy Crown Vic Seats
71 F250 PS, PB, AC, Auto, 390
Loooong way to go on this one!


72 F100 Stepside w/ 78 300 CID
Hedman Headers
Disc Brakes
Power Steering with 3 STILL on the tree
Comfy Crown Vic Seats
71 F250 PS, PB, AC, Auto, 390
Loooong way to go on this one!


- 72stepside
- Blue Oval Fan

- Posts: 537
- Joined: Tue May 09, 2006 10:31 pm
- Location: Florida, Milton
- Contact:
re: Project "Uncle Fester"-POR15 applied 2/11/2008
Not much of an update but I figured I'd post up some of the pictures of my leaf spring bushing puller in action. After a month of a bathroom remodel and a bout with bronchitis, I finally got a little done today.
This puller is just a piece of threaded stock about a foot long with a series of nuts and washers on it. The piece of pipe is the size of the spring eye, allowing the bushing and metal case to slide through when I put the pressure to it.
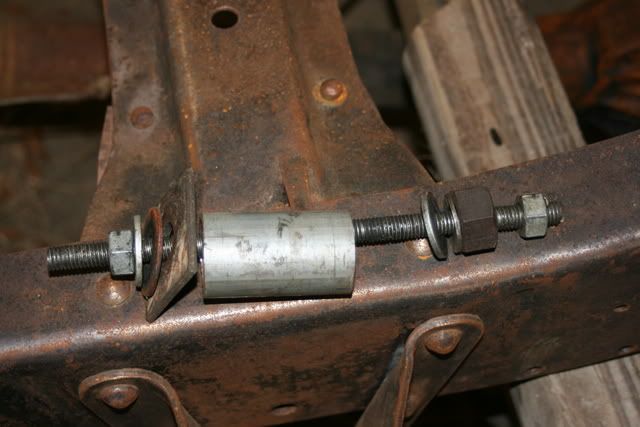
Here it is in the spring eye all loaded up. I start with just a nut pressing the inner metal sleeve and the rubber out of the spring eye.
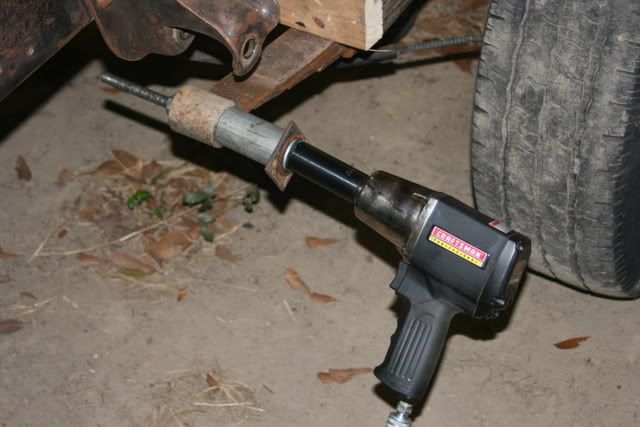
Here is the inner metal sleeve and part of the rubber after the first pass.
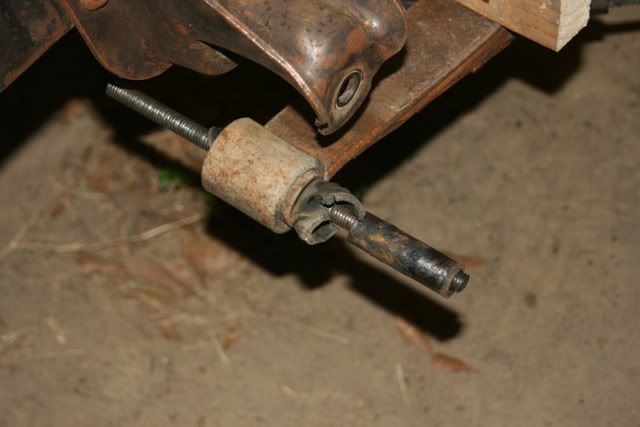
To get out the outer metal bushing case, I ground a washer to the diameter of the case. I have an extra washer on there just to strengthen everything.
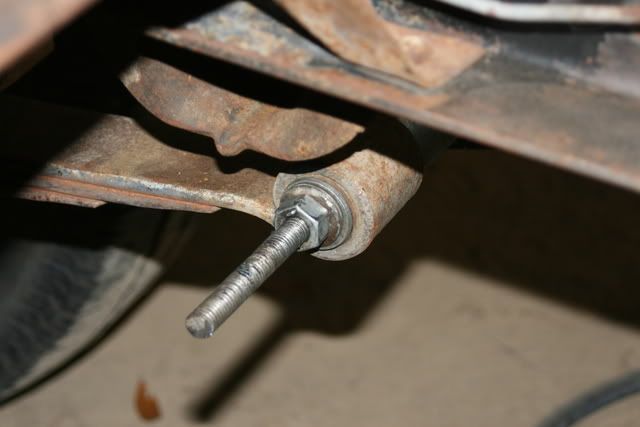
After applying a liberal amount of wheel bearing grease to the threaded stock, I put the power to it. Here's the final result with the outer case in the puller.
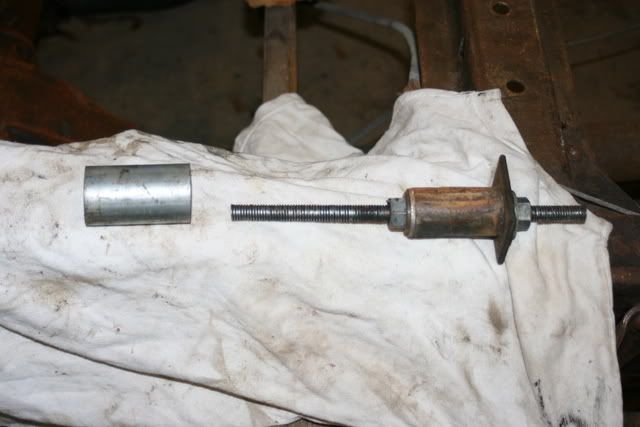
I'll work on getting this end of the spring and the spring bracket all cleaned up and ready for POR-15 over the next couple of days. I'll post more pics when I get all the bushings in.
This puller is just a piece of threaded stock about a foot long with a series of nuts and washers on it. The piece of pipe is the size of the spring eye, allowing the bushing and metal case to slide through when I put the pressure to it.

Here it is in the spring eye all loaded up. I start with just a nut pressing the inner metal sleeve and the rubber out of the spring eye.

Here is the inner metal sleeve and part of the rubber after the first pass.

To get out the outer metal bushing case, I ground a washer to the diameter of the case. I have an extra washer on there just to strengthen everything.

After applying a liberal amount of wheel bearing grease to the threaded stock, I put the power to it. Here's the final result with the outer case in the puller.

I'll work on getting this end of the spring and the spring bracket all cleaned up and ready for POR-15 over the next couple of days. I'll post more pics when I get all the bushings in.
Last edited by 72stepside on Sun Mar 16, 2008 10:37 pm, edited 1 time in total.
Chris
72 F100 Stepside w/ 78 300 CID
Hedman Headers
Disc Brakes
Power Steering with 3 STILL on the tree
Comfy Crown Vic Seats
71 F250 PS, PB, AC, Auto, 390
Loooong way to go on this one!


72 F100 Stepside w/ 78 300 CID
Hedman Headers
Disc Brakes
Power Steering with 3 STILL on the tree
Comfy Crown Vic Seats
71 F250 PS, PB, AC, Auto, 390
Loooong way to go on this one!


- 1971ford
- 100% FORDified!

- Posts: 5565
- Joined: Wed Jul 04, 2007 1:05 pm
- Location: Placerville CA
im going to be stripping my front frame rails and applying POR-15 tomorrow (Hopefully) and i just looked at all your POR-15 posts and i am sooo excited. i cant wait!

 i thought the rear last 6 inches were "horns" like the front bumper area, and i was getting worried because i thought we wouldnt be able to make new ones at the welding shop, but we can easily remake that and welded it on
  (the last 6 inches of my frame became familiar with a torch)
you got me very excited

you got me very excited
-Ryan
- 72stepside
- Blue Oval Fan

- Posts: 537
- Joined: Tue May 09, 2006 10:31 pm
- Location: Florida, Milton
- Contact:
re: Project "Uncle Fester"-3/16 Bushing Puller
I got the front part of the "bed frame" POR-15 'ed yesterday and got the remaining bushings installed tonight. Here are a few pics. You can see that I have the middle of the frame and the rear end assembly yet to paint.
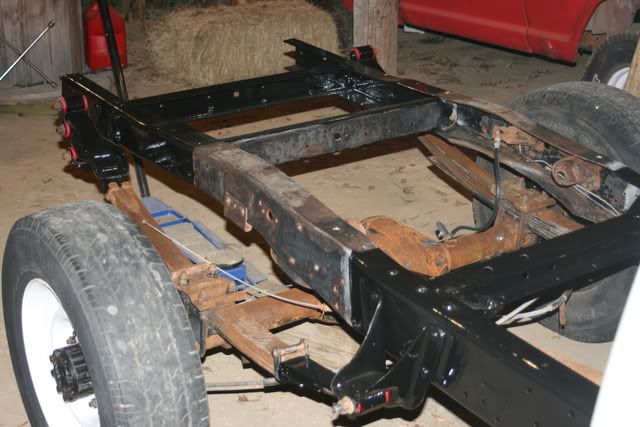
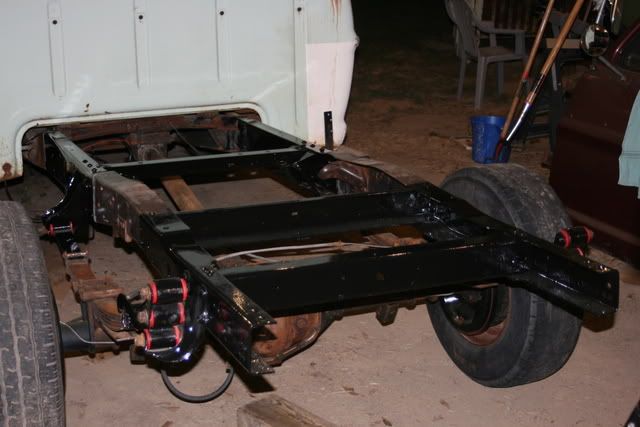
Word to those of you who are about to use POR-15. Heed the directions pertaining to placing some plastic wrap between the lid and can upon re-sealing. I was very careful and thought I hadn't dribbled any in the groove where the lid sits. WRONG !!!! There was a few little specks and that was enough for me to almost have to destroy the lid to get it off yesterday. I now have 2 ziplock bags with a paper towel between them and some large carpenters clamps (because the lid is deformed and won't seal now) to hold it all back together to keep out the air.
Another word on POR-15. Wear long sleeves as well as gloves. I have some on my elbow and up my arm that I didn't get to in time with the mineral spirits. I'll be wearing it off.
Chris
72 F100 Stepside w/ 78 300 CID
Hedman Headers
Disc Brakes
Power Steering with 3 STILL on the tree
Comfy Crown Vic Seats
71 F250 PS, PB, AC, Auto, 390
Loooong way to go on this one!


72 F100 Stepside w/ 78 300 CID
Hedman Headers
Disc Brakes
Power Steering with 3 STILL on the tree
Comfy Crown Vic Seats
71 F250 PS, PB, AC, Auto, 390
Loooong way to go on this one!


