390FE (406ci) for #50, built by Tom Lucas at FE Specialties.
Moderator: Ranchero50
-
bb429power
- Blue Oval Fan

- Posts: 585
- Joined: Sun Dec 13, 2009 5:44 pm
- Location: Plymouth Michigan
- Contact:
Re: 390FE (406ci) for #50, built by Tom Lucas at FE Specialties.
No, what happens is the engine would be tuned to that specific car. When I say that I mean the power curve (lets say you had a 5,000 lbs beast) would be adjusted to move that vehicle where it needs it like low end to get it moving. In this heavy truck you would want it tuned for low end power. Plus the gearing in the trans and axle are effecting the power output of the engine or at what speed the engine will peak. So you could have it tuned to work perfect in that vehicle, its like a coffe house, everybody is fine with just plain coffe (lets say a crate motor is the coffe). But we all want a custom order since we all have different tastes and needs (we need are engines to perform a certain way for the car we have). Am I helping or just making it more confusing? I'll figure out how to explain it better to you if needed. Its a simple concept but its difficult for me to think of the words to describe it to you. 
 Maybe so?
Justin
http://www.fordification.com/forum/view ... 22&t=47482
http://s976.photobucket.com/home/bb429power/allalbums go to both of the albums.
1967 Ford F100 longbed with a 466 500+hp/600+ft-lbs (mine)
1969 Mercury Cougar xr7 with a 351w (dads, I helped alot)
1970 Ford Maverick with a 302 (became our drag car)
1986 f150 5.0 (my DD)
"Many can argue, but it takes a real man to apologize."-Me
- OldRedFord
- Blue Oval Guru

- Posts: 1314
- Joined: Tue Jan 29, 2008 11:37 pm
- Location: Hull GA
- Contact:
Re: 390FE (406ci) for #50, built by Tom Lucas at FE Specialties.
I think $1000 is not too outrageous for a day of dyno time. But fees probably vary from area to area.
Question, even tho drag motors are dyno tuned, do they still need tuning along with the car at the track?
Question, even tho drag motors are dyno tuned, do they still need tuning along with the car at the track?
Tim
1972 F350 flatbed drw c6/390
1967 F600 project truck
1972 F350 flatbed drw c6/390
1967 F600 project truck
- Ranchero50
- Moderator

- Posts: 5799
- Joined: Wed Nov 08, 2006 7:02 pm
- Location: Maryland, Hagerstown
- Contact:
Re: 390FE (406ci) for #50, built by Tom Lucas at FE Specialties.
I can see active diagnostics on the chassis dyno, but I doubt I could change my motor to be a low end grunt motor vs. a high rpm runner via carb and ignition timing. I can change the distributor curve (or at least see where the timing needs to be) if I have the correct diagnostic stuff.
 I only checked mine on the dyno after tweaking it to run it's best on the street.
Jamie
Jamie
'70 F-350 CS Cummins 6BT 10klb truck 64k mile Bahama Blue
Contact me for CNC Dome Lamp Bezels and Ash Tray pulls.
Contact me for CNC Dome Lamp Bezels and Ash Tray pulls.
-
bb429power
- Blue Oval Fan

- Posts: 585
- Joined: Sun Dec 13, 2009 5:44 pm
- Location: Plymouth Michigan
- Contact:
Re: 390FE (406ci) for #50, built by Tom Lucas at FE Specialties.
The difference is you can adjust the power curve by changing the ignition and cam timing, then stuff like the secondaries. After a plain old engine dyno, you can but don't have to make adjustments at the track. If you do it will just be to get the peak performance for when you drive/race that car. It would just be moving the dizzy and changing secondary springs. I'm not trying to say drop everything and never use a regular dyno again, I'm just saying that if you can find a place that does a chassis dyno for around the same or a lower price, you might want to look into it. But it wont tell you the true horsepower or "flywheel horsepower". So the numbers will be lower.
Justin
http://www.fordification.com/forum/view ... 22&t=47482
http://s976.photobucket.com/home/bb429power/allalbums go to both of the albums.
1967 Ford F100 longbed with a 466 500+hp/600+ft-lbs (mine)
1969 Mercury Cougar xr7 with a 351w (dads, I helped alot)
1970 Ford Maverick with a 302 (became our drag car)
1986 f150 5.0 (my DD)
"Many can argue, but it takes a real man to apologize."-Me
http://www.fordification.com/forum/view ... 22&t=47482
http://s976.photobucket.com/home/bb429power/allalbums go to both of the albums.
1967 Ford F100 longbed with a 466 500+hp/600+ft-lbs (mine)
1969 Mercury Cougar xr7 with a 351w (dads, I helped alot)
1970 Ford Maverick with a 302 (became our drag car)
1986 f150 5.0 (my DD)
"Many can argue, but it takes a real man to apologize."-Me
- robroy
- 100% FORDified!

- Posts: 3768
- Joined: Sun Jul 06, 2008 4:36 pm
- Location: California, Salinas
Re: 390FE (406ci) for #50, built by Tom Lucas at FE Specialties.
Good evening Jamie, BB429Power, Alvin, 70_F100, and Tim, thanks for your excellent replies!
I can't explain it, but time spent on organization usually feels ineffective to me, yet I know rationally that quite the opposite's true; there's nothing like a clean, organized work area. I probably inherited this odd subconscious preference for disarray, not that that's a good excuse!
Alvin, 70_F100, Tim, and Jamie, thanks for your dyno and tuning thoughts also! Since I'm not quite ready to begin thinking about those topics I'll skip responding individually to each of your posts--or at least postpone it--yet I really appreciate your posts!
Thanks to the generous advice I've received in Spacer plate, inspection cover, and header clearance issues, I've managed to make some more progress.
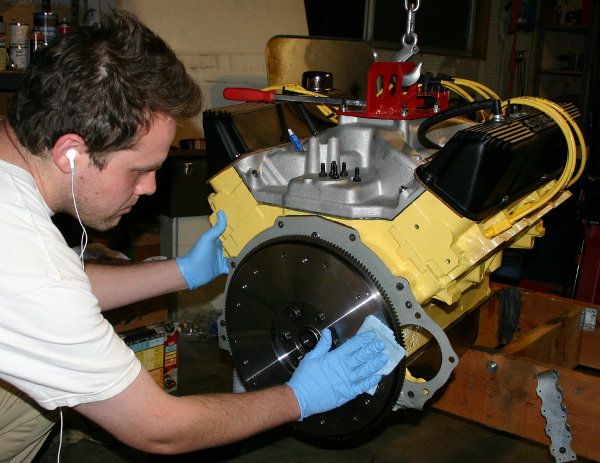
I installed the flywheel for the final time, stepping up the bolt torques carefully to 80 ft/lbs and using red thread lock. I also paid a lot of attention to the bolt lengths, and I'm happy to report that they're the ideal length. They have complete thread engagement without sticking out on the front side of the crankshaft flange at all! Here I am getting the flywheel immaculate with brake cleaner.
With the cumbersome job of installing the clutch and pressure plate complete, I removed the clutch alignment tool. As documented in Pilot bushings, bearings, and bell housing alignment, I used my modified alignment tool here--I had to reduce its diameter slightly to slip in to the pilot bearing.
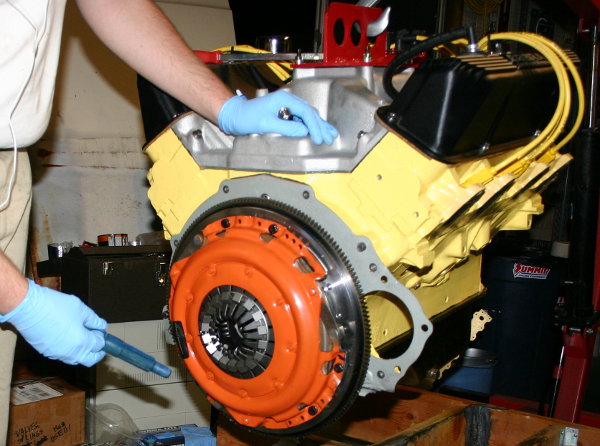
Then I torqued the pressure plate bolts down to ~28-30 ft/lbs. Thanks to Frank and Fordman for their great advice in Torque spec for pressure plate bolts?
I used red thread lock on these bolts too, even though their torque value's a lot less. The particular caliber of red thread lock I have is the mellow variety (it's not the strongest available), and they were easy to remove after the first time around (last time I pulled the engine).

With the pressure plate complete, I did the final bell housing installation. I torqued its bolts to 40 ft/lbs.
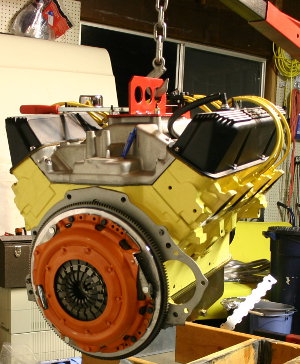
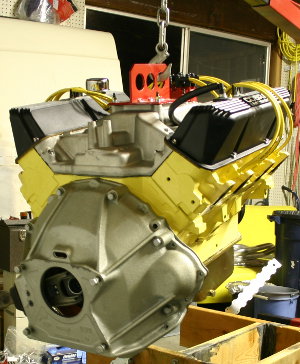
Then I wheeled the engine and transmission nearby one another! Tomorrow I'll stab 'em together.
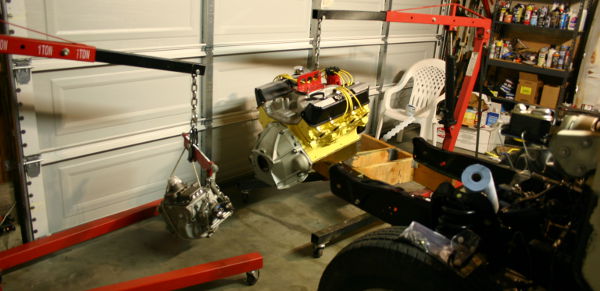
Jamie, BB429Power, Alvin, 70_F100, and Tim, thanks for your superb replies!
Robroy
I know what you mean! When working outdoors I naturally developed the habit of cleaning up and organizing the tools at the end of each day, but I find that I'm getting spoiled quickly by the garage work area. I'll leave tools everywhere until I force myself to focus on organization!Ranchero50 wrote:A timer... Heck that's usually the first step on a new weekend, gather all the tools and clean up the mess from the kids or the last project, then put the tools away.
I can't explain it, but time spent on organization usually feels ineffective to me, yet I know rationally that quite the opposite's true; there's nothing like a clean, organized work area. I probably inherited this odd subconscious preference for disarray, not that that's a good excuse!
BB429Power, that sounds like a great deal you've found! I also enjoyed reading your thoughts on dyno and tuning techniques. You provoked a good discussion. When I get near the point where I'm ready to consider my first chassis dyno, I'll check back with you for your thoughts on the specifics of my situation.bb429power wrote:Maybe you should talk to my builder in Michigan. He takes it to a buddy of his in Ohio and tunes it for a total of like $500. Then he's getting us a deal on a chassis dyno to tune it to the car, we didn't get the engine dynoed at all.
Alvin, 70_F100, Tim, and Jamie, thanks for your dyno and tuning thoughts also! Since I'm not quite ready to begin thinking about those topics I'll skip responding individually to each of your posts--or at least postpone it--yet I really appreciate your posts!
Thanks to the generous advice I've received in Spacer plate, inspection cover, and header clearance issues, I've managed to make some more progress.
I installed the flywheel for the final time, stepping up the bolt torques carefully to 80 ft/lbs and using red thread lock. I also paid a lot of attention to the bolt lengths, and I'm happy to report that they're the ideal length. They have complete thread engagement without sticking out on the front side of the crankshaft flange at all! Here I am getting the flywheel immaculate with brake cleaner.
With the cumbersome job of installing the clutch and pressure plate complete, I removed the clutch alignment tool. As documented in Pilot bushings, bearings, and bell housing alignment, I used my modified alignment tool here--I had to reduce its diameter slightly to slip in to the pilot bearing.
Then I torqued the pressure plate bolts down to ~28-30 ft/lbs. Thanks to Frank and Fordman for their great advice in Torque spec for pressure plate bolts?
I used red thread lock on these bolts too, even though their torque value's a lot less. The particular caliber of red thread lock I have is the mellow variety (it's not the strongest available), and they were easy to remove after the first time around (last time I pulled the engine).
With the pressure plate complete, I did the final bell housing installation. I torqued its bolts to 40 ft/lbs.
Then I wheeled the engine and transmission nearby one another! Tomorrow I'll stab 'em together.
Jamie, BB429Power, Alvin, 70_F100, and Tim, thanks for your superb replies!
Robroy
Last edited by robroy on Thu Mar 18, 2010 4:40 am, edited 1 time in total.
- basketcase0302
- 100% FORDified!

- Posts: 6805
- Joined: Thu Jan 26, 2006 7:11 am
- Location: Hawthorne, Florida
Re: 390FE (406ci) for #50, built by Tom Lucas at FE Specialties.
Robroy,
I'm on the edge of my seat biting my nails...
I know the video should come any day now, of the engine in the truck!
I'm on the edge of my seat biting my nails...
I know the video should come any day now, of the engine in the truck!
Jeff
http://www.fordification.com/forum/view ... 22&t=46251
SOLD-71 F-350 dually flatbed, 302 / .030 over V-8 with a "baby"C-6, B & M truckshifter, Dana70/4.11 ratio, intermittent wipers, tilt steering, full LED lighting on the flat bed, and no stereo yet (this way I can hear the rattles to diagnose)! SOLD!
Many Ford bumps / one 76' EB / and several dents through the years.
A lot of "oddball" Ford parts collected from working on them for 34 years now!
2008 Ford Escape 4 x 4
- robroy
- 100% FORDified!

- Posts: 3768
- Joined: Sun Jul 06, 2008 4:36 pm
- Location: California, Salinas
Re: 390FE (406ci) for #50, built by Tom Lucas at FE Specialties.
Good evening Jeff, thanks for replying!
I'll probably have the engine in and running in two or there more weeks, but it could happen much sooner. As you know, sometimes things fly together in hours and other times it's a long process full of oddball, tricky puzzles.
I'd think that having put all this together before--and quite recently even--would make things go much more quickly this time! And that's true to some degree. Yet I find myself wanting to improve on the way I implemented it last time!
Thanks again for your excellent reply Jeff!
Robroy
Well thanks for being interested!basketcase0302 wrote:I'm on the edge of my seat biting my nails...
I know the video should come any day now, of the engine in the truck!
I'll probably have the engine in and running in two or there more weeks, but it could happen much sooner. As you know, sometimes things fly together in hours and other times it's a long process full of oddball, tricky puzzles.
I'd think that having put all this together before--and quite recently even--would make things go much more quickly this time! And that's true to some degree. Yet I find myself wanting to improve on the way I implemented it last time!
Thanks again for your excellent reply Jeff!
Robroy
- Ranchero50
- Moderator

- Posts: 5799
- Joined: Wed Nov 08, 2006 7:02 pm
- Location: Maryland, Hagerstown
- Contact:
Re: 390FE (406ci) for #50, built by Tom Lucas at FE Specialties.
One suggestion since you are this close;
Since we read about headers eating starters so often I would suggest mocking the headers and starter now and checking the clearance between the headers and starter. This is an ideal time to fab up a heat shield to help protect the starter from the header heat so this may actually be the 'final' time you put it together. At this point you can easily drill and tap the cast iron bellhousing lip around the starter for a couple 1/4-20 bolts and cut a sheet of metal 7"x8" and bolt it on.
Simple and effective.
Jamie
'70 F-350 CS Cummins 6BT 10klb truck 64k mile Bahama Blue
Contact me for CNC Dome Lamp Bezels and Ash Tray pulls.
Contact me for CNC Dome Lamp Bezels and Ash Tray pulls.
-
Skifu
- Preferred User

- Posts: 272
- Joined: Sun Aug 17, 2008 11:01 am
- Location: Panama canal zone
Re: 390FE (406ci) for #50, built by Tom Lucas at FE Specialties.
Nice engine,looks like you used good parts,I know the joys of having a good shop,its great,I as well hate to organize tools and such,cleaning up takes away from other things,but sooner or later,we just got to do it.have you ever spent 30 minutes looking for a 10mm socket?and had it in your pocket?Its fun,is it not!!!
94 Ford F-150 super cab
300-6 eod auto,changing to NP-435
300-6 eod auto,changing to NP-435
-
Skifu
- Preferred User

- Posts: 272
- Joined: Sun Aug 17, 2008 11:01 am
- Location: Panama canal zone
Re: 390FE (406ci) for #50, built by Tom Lucas at FE Specialties.
Is this the 390 that this lucas guy built for you? I was under the impression you had to finish it up yourself,Im glad its all coming together,nothing is more aggravating than waiting on a motor or parts for your ride.sorry,Ive not followed this thread for a while.
94 Ford F-150 super cab
300-6 eod auto,changing to NP-435
300-6 eod auto,changing to NP-435
-
Alvin in AZ
- Blue Oval Fan

- Posts: 583
- Joined: Thu Feb 19, 2009 3:50 pm
- Location: Gadsden Purchase
- Contact:
Re: 390FE (406ci) for #50, built by Tom Lucas at FE Specialties.
[quote="Ranchero50"
This is an ideal time to fab up a heat shield to help protect the starter...
...you can easily drill and tap the cast iron bellhousing lip around the starter
for a couple 1/4-20 bolts and cut a sheet of metal 7"x8" and bolt it on.
Simple and effective.
Jamie[/quote]
Wow! Cool one, Jamie. :)
Robroy you gotta do this. ;)
But we gotta have pictures tho, Jamie ...anyone?
Alvin in AZ
- robroy
- 100% FORDified!

- Posts: 3768
- Joined: Sun Jul 06, 2008 4:36 pm
- Location: California, Salinas
Re: 390FE (406ci) for #50, built by Tom Lucas at FE Specialties.
Good evening Jamie, Skifu, and Alvin, thanks for replying!
Today I wrote Robb at RobbMc about the starter heat shield idea. I've heard that the RobbMc starters are highly resistant to heat problems, so I wasn't sure how necessary a shield was for it.
Robb himself replied right away as he always seems to (amazing service). I read in his mail that if I have at least 1/2" of clearance all around the starter, and especially the starter solenoid, I probably don't need to worry about heat shielding. I also read that if I have 1" or more of clearance, a shield's certainly not necessary.
I measured the clearance and took some photos. The clearance ranged from about 1" to about 1 and 1/2", depending on where the measurement was taken! I sent the photos to Robb and he said that a shield's unnecessary.
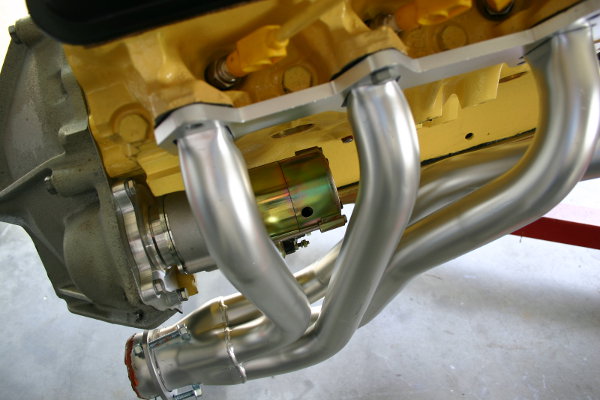
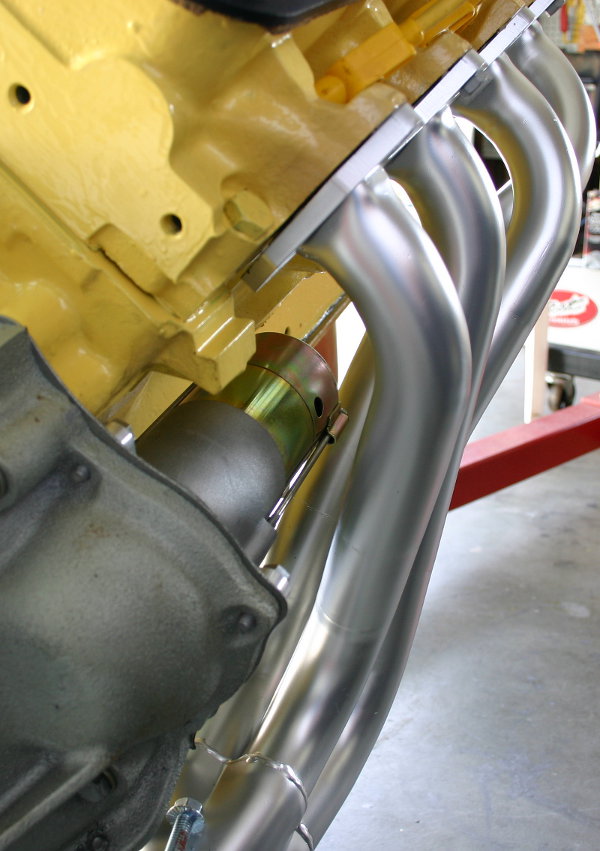
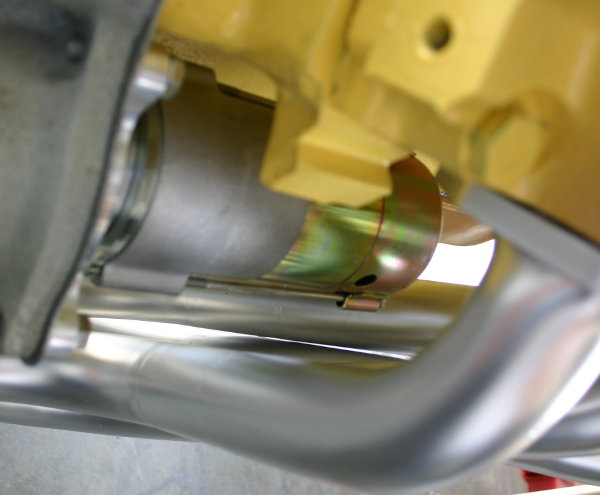
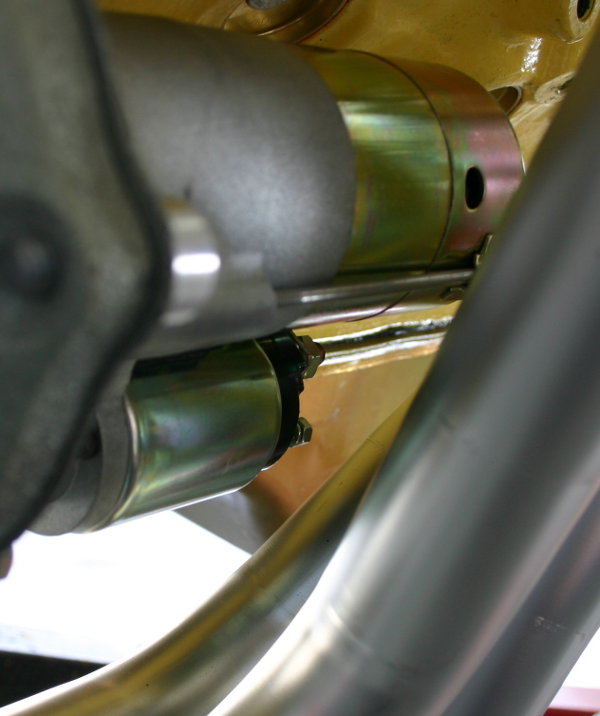
Robb also mentioned that if I were to install a shield, the shield should be as close to the header tubes as possible, to provide for maximum air flow around the starter--interesting!
Jamie, Skifu, and Alvin, thanks for your fantastic replies!
Robroy
That's an excellent idea! I gave this a whirl today (more later in this post).Ranchero50 wrote:One suggestion since you are this close;
Since we read about headers eating starters so often I would suggest mocking the headers and starter now and checking the clearance between the headers and starter.
That sounds like a smart idea!Ranchero50 wrote:This is an ideal time to fab up a heat shield to help protect the starter from the header heat so this may actually be the 'final' time you put it together. At this point you can easily drill and tap the cast iron bellhousing lip around the starter for a couple 1/4-20 bolts and cut a sheet of metal 7"x8" and bolt it on.
Today I wrote Robb at RobbMc about the starter heat shield idea. I've heard that the RobbMc starters are highly resistant to heat problems, so I wasn't sure how necessary a shield was for it.
Robb himself replied right away as he always seems to (amazing service). I read in his mail that if I have at least 1/2" of clearance all around the starter, and especially the starter solenoid, I probably don't need to worry about heat shielding. I also read that if I have 1" or more of clearance, a shield's certainly not necessary.
I measured the clearance and took some photos. The clearance ranged from about 1" to about 1 and 1/2", depending on where the measurement was taken! I sent the photos to Robb and he said that a shield's unnecessary.
Robb also mentioned that if I were to install a shield, the shield should be as close to the header tubes as possible, to provide for maximum air flow around the starter--interesting!
Thanks Skifu! Yeah there's nothing like a spacious, clean work area.Skifu wrote:Nice engine,looks like you used good parts,I know the joys of having a good shop,its great
Well said! I've had that exact type of thing happen all too many times. Time spend on organization seems to pay off surprisingly well.Skifu wrote:I as well hate to organize tools and such,cleaning up takes away from other things,but sooner or later,we just got to do it.have you ever spent 30 minutes looking for a 10mm socket?and had it in your pocket?Its fun,is it not!!!
Yes, this FE was built by Tom Lucas at FE Specialties.Skifu wrote:Is this the 390 that this lucas guy built for you?
Nope! When I picked it up from Tom's shop it was pretty much ready to install.Skifu wrote:I was under the impression you had to finish it up yourself
I know what you mean! I was so busy during the wait that I hardly realized I was waiting for anything though--this time at least.Skifu wrote:Im glad its all coming together,nothing is more aggravating than waiting on a motor or parts for your ride.
That's OK! Thanks for your interest and comments Skifu.Skifu wrote:sorry,Ive not followed this thread for a while.
It was indeed a great idea! And I'm sure that with a regular starter design, it would be necessary. Yet it seems from Robb's response that this RobbMc starter doesn't require a shield at all, especially with the 1" to 1.5" clearances I have all the way around it.Alvin in AZ wrote:Wow! Cool one, Jamie.Robroy you gotta do this.
But we gotta have pictures tho, Jamie ...anyone?
Jamie, Skifu, and Alvin, thanks for your fantastic replies!
Robroy
-
Alvin in AZ
- Blue Oval Fan

- Posts: 583
- Joined: Thu Feb 19, 2009 3:50 pm
- Location: Gadsden Purchase
- Contact:
Re: 390FE (406ci) for #50, built by Tom Lucas at FE Specialties.
Yeah, it was. :)
Jaimie prob'ly just forgot (I sure enough did) that you had that fancy ;) starter.
Next header-thread I see, I'll call for pictures in -it-. ;)
Alvin in AZ
Last edited by Alvin in AZ on Sat Mar 20, 2010 11:15 am, edited 1 time in total.
- DuckRyder
- Moderator

- Posts: 4925
- Joined: Mon Jul 19, 2004 3:04 pm
- Location: Scruffy City
- Contact:
Re: 390FE (406ci) for #50, built by Tom Lucas at FE Specialties.
Nice to see the progress! 
Can't wait until #50 is driving down the road (and the chassis dyno numbers)
On a forum moderation note, let us watch the language, remember its a family friendly place let us not let it slip...
Can't wait until #50 is driving down the road (and the chassis dyno numbers)
On a forum moderation note, let us watch the language, remember its a family friendly place let us not let it slip...
Robert
1972 F100 Ranger XLT (445/C6/9” 3.50 Truetrac)
"An unarmed man can only flee from evil, and evil is not overcome by fleeing from it." -- Jeff Cooper
1972 F100 Ranger XLT (445/C6/9” 3.50 Truetrac)
"An unarmed man can only flee from evil, and evil is not overcome by fleeing from it." -- Jeff Cooper
-
Power By Ford 70 F250 4x4
- New Member

- Posts: 107
- Joined: Mon Jan 04, 2010 8:46 pm
- Location: New York
Re: 390FE (406ci) for #50, built by Tom Lucas at FE Specialties.
Its been a lot of fun reading this project ever night,expecially since I am doing the exact same thing a couple of weeks behind your progress.I have certianly learned a few things.So I would like to thank you for all the time and effort you put in to sharing your experience with us.I also would like to know what brand of headers you went with and what size primaries?