Tips-Tricks
Moderator: FORDification
-
speed bump
- New Member

- Posts: 113
- Joined: Tue Feb 26, 2008 11:31 am
- Location: Butte Montana
Re: Tips-Tricks
When doing an in engine intake gasket replacement you can take a piece of angle and run it from the cowl lip to the radiator to slide the intake manifold into position and lower it down if you don't have an engine hoist.
71 3/4 ton 4x4 highboy
68 Mercury Monteray
68 Mercury Monteray
- 1982 flareside
- Blue Oval Fan

- Posts: 639
- Joined: Tue Nov 03, 2009 9:15 pm
- Location: Leitchfield Ky
Re: Tips-Tricks
When you have a flareside bed you will find nobody can work a 1948 design. I ask my buddies to open the tailgate they look at the tailgate and holler for me to open it.
Jeremy
1971 Ford F250 camper special 360 T18(old model) 4 speed 4.11 gears 2wd with 1969 doghouse soon to be daily driver FRANKENFORD
1982 Ford F150 flareside 300 T18(new model) 4 speed 4.11 gears 4wd Daily driver
Some people say my truck is ugly and all i say is "Beauty is in the eyes of the beholder.
1971 Ford F250 camper special 360 T18(old model) 4 speed 4.11 gears 2wd with 1969 doghouse soon to be daily driver FRANKENFORD
1982 Ford F150 flareside 300 T18(new model) 4 speed 4.11 gears 4wd Daily driver
Some people say my truck is ugly and all i say is "Beauty is in the eyes of the beholder.
- BobbyFord
- 100% FORDified!

- Posts: 5373
- Joined: Sun Feb 04, 2007 9:52 am
- Location: Chatsworth, California
Re: Tips-Tricks
Here's a couple of old line tech tricks that I used when I replaced my head gaskets this weekend.
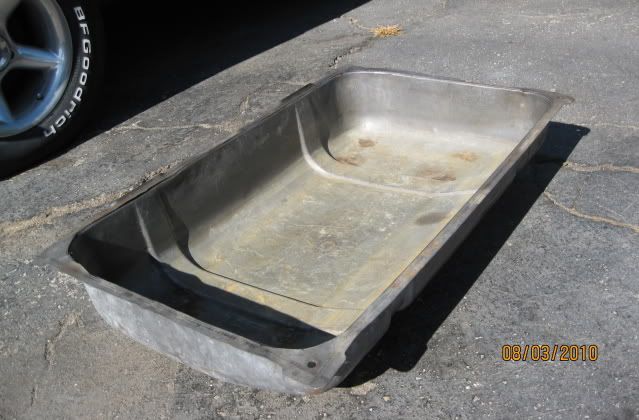
First, this is my coolant drain pan that I've had for at least 20 years. It is good for draining radiators, replacing hoses, water pumps or to put under the motor when pulling heads to catch residual coolant that remains in the block after draining the radiator. It is a galvanized gas tank that I cut the top off of. I also welded some nuts on the bottom for feet so that it doesn't get a hole in it from dragging around.


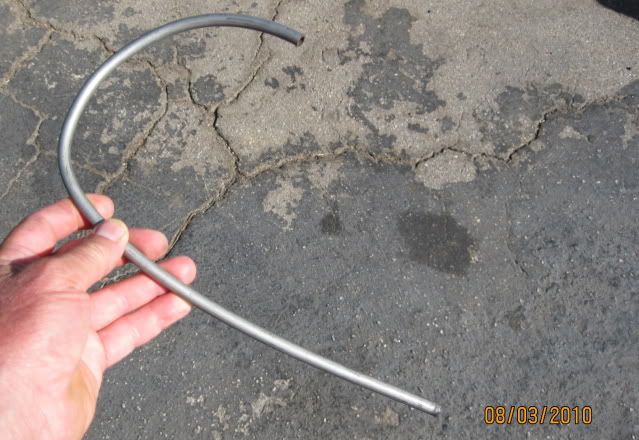
Second, (this one is cool), have you ever tried to get the coolant out of the block when replacing head gaskets or a water pump so that the coolant level was below the gasket surface that you are trying to clean and dry? I use a section of 5/16, bendable steel (or copper) line. You stick the short end of the bend into the water jacket, into the coolant, point the long end down (toward your gas tank coolant drain pan) then take your blower nozzle and point it down along side the long end of the tube (like making an arrowhead) and blow the air past the opening of the tube. The air passing the end of the tube starts a siphon in the tube and drains the water jacket

First, this is my coolant drain pan that I've had for at least 20 years. It is good for draining radiators, replacing hoses, water pumps or to put under the motor when pulling heads to catch residual coolant that remains in the block after draining the radiator. It is a galvanized gas tank that I cut the top off of. I also welded some nuts on the bottom for feet so that it doesn't get a hole in it from dragging around.


Second, (this one is cool), have you ever tried to get the coolant out of the block when replacing head gaskets or a water pump so that the coolant level was below the gasket surface that you are trying to clean and dry? I use a section of 5/16, bendable steel (or copper) line. You stick the short end of the bend into the water jacket, into the coolant, point the long end down (toward your gas tank coolant drain pan) then take your blower nozzle and point it down along side the long end of the tube (like making an arrowhead) and blow the air past the opening of the tube. The air passing the end of the tube starts a siphon in the tube and drains the water jacket

- 72sportc
- New Member

- Posts: 61
- Joined: Sun Apr 22, 2007 11:05 am
- Location: southern ontario
Re: Tips-Tricks
A good way to pull a steering wheel without damaging it, is to get yourself a fine thread 3" bolt and deep nut that is the same diameter as your steering shaft. Remove the nut holding the steering wheel, and install the deep nut and bolt part way over the shaft, leaving it approximately half an inch from the steering wheel. With one hand pulling up at the top of the wheel, and your knee putting tension under the bottom of the steering wheel, smack the head of the bolt with a BFH. This will drive the splined shaft out without hurting the wheel. A couple different sizes of bolts will do many different cars.
M J K
72 Sport Custom Shortbox
71 F350 Dually
66 Shortbox Top Chop
72 Sport Custom Shortbox
71 F350 Dually
66 Shortbox Top Chop
- 70_F100
- Moderator

- Posts: 2999
- Joined: Mon Oct 22, 2007 11:23 am
- Location: North Carolina, Kernersville
Re: Tips-Tricks
Yeah, but Advance Auto and Autozone will loan you a puller for free.72sportc wrote:A good way to pull a steering wheel without damaging it, is to get yourself a fine thread 3" bolt and deep nut that is the same diameter as your steering shaft. Remove the nut holding the steering wheel, and install the deep nut and bolt part way over the shaft, leaving it approximately half an inch from the steering wheel. With one hand pulling up at the top of the wheel, and your knee putting tension under the bottom of the steering wheel, smack the head of the bolt with a BFH. This will drive the splined shaft out without hurting the wheel. A couple different sizes of bolts will do many different cars.
Much simpler and easier. Don't need a BFH for that...
Wise men talk because they have something to say; fools talk because they have to say something.--Plato
Why is it that there's seldom time to fix it right the first time, but there's always time to fix it right the second time???
That's not an oil leak That's SWEAT from all that HORSEPOWER!!
Why is it that there's seldom time to fix it right the first time, but there's always time to fix it right the second time???
That's not an oil leak
-
fitzwell
- Blue Oval Fanatic

- Posts: 779
- Joined: Wed May 10, 2006 2:16 pm
- Location: East of a rock, west of a hard place
Re: Tips-Tricks
when trying to loosen a nut that has been in place for a loooong time. try tightening it just a bit first. Busts the corrosion loose. If you're in a wrecking yard & need to remove someting that looks like it might need a bit of lube, find a vehicle close by with an automatic trans, pull the dipstick & voila.. couple of drops can work wonders.
As a metter of fact, i AM trying to keep up with the Jones'
Driving like Parnelli, Drinkin' like George
-------------------------------------------------------
Driving like Parnelli, Drinkin' like George
-------------------------------------------------------
- Happy_Camper
- Preferred User

- Posts: 341
- Joined: Thu Oct 23, 2008 10:46 pm
Re: Tips-Tricks
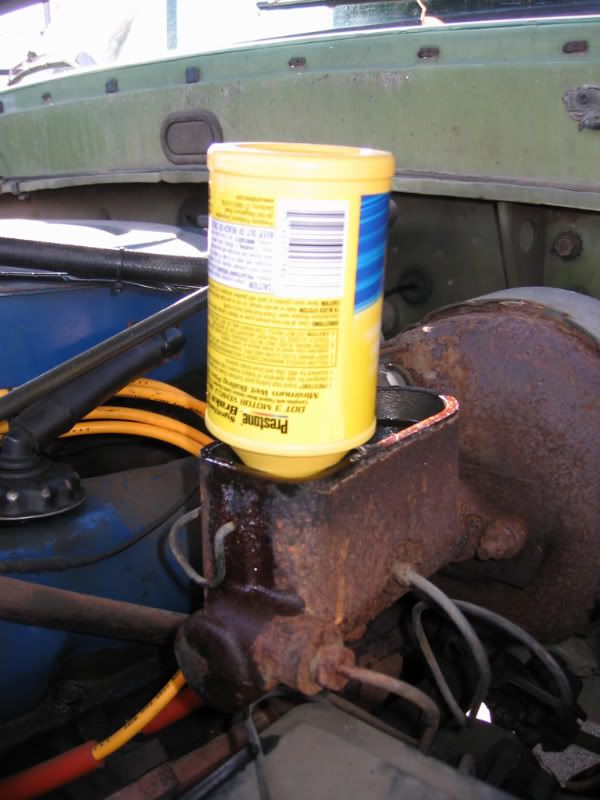
When bleeding brakes, flip the bottle of brake fluid upside down in the reservoir.
Like this:

Make the mechanical adjustments first.
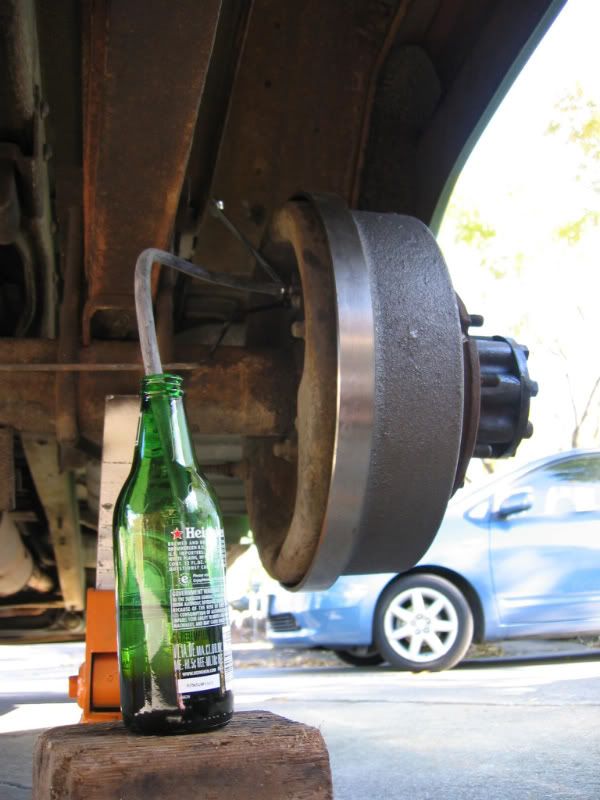
Use a bit of teflon tape around just the threaded portion of the bleeder screw. Open the screw about 1 turn, and put a piece of vacuum tube from the screw into a bottle with a bit of clean brake fluid. Pump the pedal on a 4 second count (two seconds down, two seconds up). As soon as the fluid comes out clear, tighten the bleeder and move to the next wheel.

Doing it this way will usually not disturb the balance of the proportioning valve, so it does not have to be reset.
Like this:

Make the mechanical adjustments first.
Use a bit of teflon tape around just the threaded portion of the bleeder screw. Open the screw about 1 turn, and put a piece of vacuum tube from the screw into a bottle with a bit of clean brake fluid. Pump the pedal on a 4 second count (two seconds down, two seconds up). As soon as the fluid comes out clear, tighten the bleeder and move to the next wheel.

Doing it this way will usually not disturb the balance of the proportioning valve, so it does not have to be reset.
Scott
1972 F250 Explorer C/S, 390-2V, Dual exhaust, C6, Goose neck ball in bed
New and improved with Tilt Wheel, Intermittent Wipers, 2005 Bench seat and 5th wheel camper!...
Life is *very* good!

1972 F250 Explorer C/S, 390-2V, Dual exhaust, C6, Goose neck ball in bed
New and improved with Tilt Wheel, Intermittent Wipers, 2005 Bench seat and 5th wheel camper!...
Life is *very* good!
