1969 Ranger - Project Glory Days!
Moderator: FORDification
-
67mann

- 100% FORDified!

- Posts: 1706
- Joined: Thu Feb 07, 2008 7:19 am
- Location: NY..Mt.Morris 3rdgen. homestead
Re: 1969 Ranger - Project Glory Days!
I've had enough and I'm not alone
http://s267.photobucket.com/albums/ii304/67mann/
http://s267.photobucket.com/albums/ii304/67mann/
-
tylerb43

- Preferred User

- Posts: 492
- Joined: Fri Nov 14, 2008 2:54 pm
- Location: Union, MO
Re: 1969 Ranger - Project Glory Days!
Thanks for the encouragement! I'm going to tackle them this weekend.
I bought the outer corners from Dennis Carpenter, hoping they fit pretty well. My brother runs several collision shops, and he's a big fan of using the panel bonding stuff with a flanged overlap. But I don't have any of that right now, so my plan is to butt weld them. Opinions? Should I wait for him to help or should I just go for the butt weld??
If I butt weld - I'm not really sure what I'll use to cut a precise line on both the cab and the corner to mate them up for the butt weld. My plan is to follow the lead of what I've seen Kevin Tetz do on Trucks, and make a straight line on the panel with tape, cut that, and then position the panel correctly and transfer that line onto the cab. For cutting tools I have; a .040 wheel on my angle grinder, metal blade on my sawzall, an air cutoff wheel (which sucks), IR air shears, and jig saw with a sheet metal blade. I'm not sure which tool will work best, but I guess I'll find out. Really wish I had an air body saw, but I don't yet. Oh - Have a plasma, but I doubt that's the right tool here.
My plan is to use seam sealer and undercoating to coat the interior surfaces of the inner and outer corners before I mate them together for added corrosion protection and sound deadening. And yes, I'm going to keep the drain holes on the bottom seam.
Wish me luck!
-
sargentrs

- 100% FORDified!
- Posts: 9866
- Joined: Fri Jun 22, 2007 9:30 am
- Location: Georgia, Jasper
Re: 1969 Ranger - Project Glory Days!
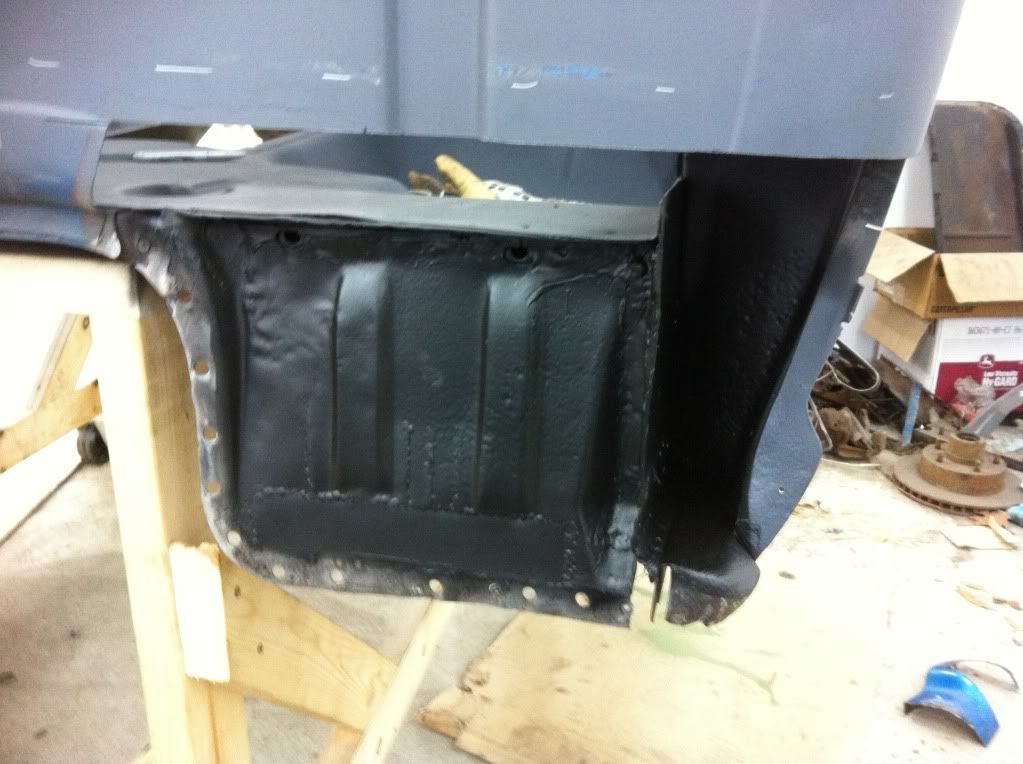
I sure could use one of those RH inners. 
Randy
1970 F100 Sport Custom Limited LWB, 302cid, 3 on the tree. NO A/C, NO P/S, NO P/B. Currently in 1000 pcs while rebuilding. Project thread: http://www.fordification.com/forum/view ... 22&t=59995 Plan: 351w, C4, LSD, pwr front disc, p/s, a/c, bucket seats, new interior and paint.
1987 F-150 XLT Lariat, 5.0/C6 auto.
-
67nukeford

- Blue Oval Fan

- Posts: 589
- Joined: Tue Aug 19, 2008 3:20 pm
- Location: Nebraska, Omaha/Elkhorn
Re: 1969 Ranger - Project Glory Days!
Good question about what to cut with. I was thinking using the tape, and then the cutoff wheel, but you'd have to really go slow. I have an air saw, and you have to be really careful with that thing also, it can get away from you quick! Good luck Tyler, looking forward to seeing the finished product!
-
67nukeford
- Blue Oval Fan
- Posts: 589
- Joined: Tue Aug 19, 2008 3:20 pm
- Location: Nebraska, Omaha/Elkhorn
Re: 1969 Ranger - Project Glory Days!
Tyler, good score on those inner panels! I might have to see if I can score the same thing, otherwise it's fab-up time, and those might not be fun to make.
-
sargentrs
- 100% FORDified!
- Posts: 9866
- Joined: Fri Jun 22, 2007 9:30 am
- Location: Georgia, Jasper
Re: 1969 Ranger - Project Glory Days!
Never actually done it myself and don't know if it's possible but I've got to do something similar and I was thinking about clamping the patch panel over the damaged panel and then cutting through both at the same time with a cut off wheel on my die grinder, similar technique used to trim a patch piece of vinyl. That way you match up no matter how you cut it. Depends on the contour of the patch. A flat panel would be fairly easy to do but a bent/embossed one would probably not be possible. Just a thought.
Randy
1970 F100 Sport Custom Limited LWB, 302cid, 3 on the tree. NO A/C, NO P/S, NO P/B. Currently in 1000 pcs while rebuilding. Project thread: http://www.fordification.com/forum/view ... 22&t=59995 Plan: 351w, C4, LSD, pwr front disc, p/s, a/c, bucket seats, new interior and paint.
1987 F-150 XLT Lariat, 5.0/C6 auto.
1970 F100 Sport Custom Limited LWB, 302cid, 3 on the tree. NO A/C, NO P/S, NO P/B. Currently in 1000 pcs while rebuilding. Project thread: http://www.fordification.com/forum/view ... 22&t=59995 Plan: 351w, C4, LSD, pwr front disc, p/s, a/c, bucket seats, new interior and paint.
1987 F-150 XLT Lariat, 5.0/C6 auto.
-
elgemcdlf

- 100% FORDified!
- Posts: 1855
- Joined: Mon Nov 01, 2010 2:04 pm
- Location: Ringgold, GA
Re: 1969 Ranger - Project Glory Days!
You are mistaken. If you place on top of each other and cut both they will not match. Your patch piece will be smaller than your hole being patched. You have not accounted for the width of the blade being used to make the cut. Cut out the area you want removed then place your patch material behind your hole and mark the patch material. The line you draw is inside of yoru cut wheel when you cut it out. Clear as mud yet?sargentrs wrote:Never actually done it myself and don't know if it's possible but I've got to do something similar and I was thinking about clamping the patch panel over the damaged panel and then cutting through both at the same time with a cut off wheel on my die grinder, similar technique used to trim a patch piece of vinyl. That way you match up no matter how you cut it. Depends on the contour of the patch. A flat panel would be fairly easy to do but a bent/embossed one would probably not be possible. Just a thought.
-
Fordnatic
- Preferred User
- Posts: 274
- Joined: Wed Dec 17, 2008 7:29 am
- Location: Anchorage, Alaska
Re: 1969 Ranger - Project Glory Days!
I've found that if it's a thin enough cut off wheel it leaves the perfect gap for good penetration while welding.
70F100: 410 Merc with tri-power, close ratio toploader, 4.56 detroit locker 9"
68F100 4x4: 390, 4 spd/NP 205, Rancho 4" urethane susp, 35x12.50 All Terrain T/A's
55F100
01F150 Daily Driver: TP tunes, AF1 intake, elec fans, Magnaflow exh, underdrive pulleys, Centerlines
68F100 4x4: 390, 4 spd/NP 205, Rancho 4" urethane susp, 35x12.50 All Terrain T/A's
55F100
01F150 Daily Driver: TP tunes, AF1 intake, elec fans, Magnaflow exh, underdrive pulleys, Centerlines
-
sargentrs
- 100% FORDified!
- Posts: 9866
- Joined: Fri Jun 22, 2007 9:30 am
- Location: Georgia, Jasper
Re: 1969 Ranger - Project Glory Days!
Good point. Thanks for the tip.elgemcdlf wrote:You are mistaken. If you place on top of each other and cut both they will not match. Your patch piece will be smaller than your hole being patched. You have not accounted for the width of the blade being used to make the cut. Cut out the area you want removed then place your patch material behind your hole and mark the patch material. The line you draw is inside of yoru cut wheel when you cut it out. Clear as mud yet?sargentrs wrote:Never actually done it myself and don't know if it's possible but I've got to do something similar and I was thinking about clamping the patch panel over the damaged panel and then cutting through both at the same time with a cut off wheel on my die grinder, similar technique used to trim a patch piece of vinyl. That way you match up no matter how you cut it. Depends on the contour of the patch. A flat panel would be fairly easy to do but a bent/embossed one would probably not be possible. Just a thought.
Randy
1970 F100 Sport Custom Limited LWB, 302cid, 3 on the tree. NO A/C, NO P/S, NO P/B. Currently in 1000 pcs while rebuilding. Project thread: http://www.fordification.com/forum/view ... 22&t=59995 Plan: 351w, C4, LSD, pwr front disc, p/s, a/c, bucket seats, new interior and paint.
1987 F-150 XLT Lariat, 5.0/C6 auto.
1970 F100 Sport Custom Limited LWB, 302cid, 3 on the tree. NO A/C, NO P/S, NO P/B. Currently in 1000 pcs while rebuilding. Project thread: http://www.fordification.com/forum/view ... 22&t=59995 Plan: 351w, C4, LSD, pwr front disc, p/s, a/c, bucket seats, new interior and paint.
1987 F-150 XLT Lariat, 5.0/C6 auto.
-
67mann
- 100% FORDified!
- Posts: 1706
- Joined: Thu Feb 07, 2008 7:19 am
- Location: NY..Mt.Morris 3rdgen. homestead
Re: 1969 Ranger - Project Glory Days!
Good point for woodworking......butt welding,you need that gap for heat distortion. Like 69 said.....a thin cutting wheelsargentrs wrote:Good point. Thanks for the tip.elgemcdlf wrote:You are mistaken. If you place on top of each other and cut both they will not match. Your patch piece will be smaller than your hole being patched. You have not accounted for the width of the blade being used to make the cut. Cut out the area you want removed then place your patch material behind your hole and mark the patch material. The line you draw is inside of yoru cut wheel when you cut it out. Clear as mud yet?sargentrs wrote:Never actually done it myself and don't know if it's possible but I've got to do something similar and I was thinking about clamping the patch panel over the damaged panel and then cutting through both at the same time with a cut off wheel on my die grinder, similar technique used to trim a patch piece of vinyl. That way you match up no matter how you cut it. Depends on the contour of the patch. A flat panel would be fairly easy to do but a bent/embossed one would probably not be possible. Just a thought.
I've had enough and I'm not alone
http://s267.photobucket.com/albums/ii304/67mann/
http://s267.photobucket.com/albums/ii304/67mann/
-
elgemcdlf
- 100% FORDified!
- Posts: 1855
- Joined: Mon Nov 01, 2010 2:04 pm
- Location: Ringgold, GA
Re: 1969 Ranger - Project Glory Days!
If you have a heat distribution problem you are way too hot. I learned from an old man who remembered when they came out with the original Bondo. Everything I have read on sheet metal repair remains as he taught all of us. Oxy/Acetelene is the best way to weld sheet metal and minimal gap is best. You should be able to almost weld it together without any rod. Why oxy/acetelene? It is a "soft" weld that can be worked just like sheet metal as opposed or mig or tig which produce much "harder" welds. Use a very small tip and pack the area around with whatever the material is they use nowadays to absorb heat. Back then it was asbestos.67mann wrote: Good point for woodworking......butt welding,you need that gap for heat distortion. Like 69 said.....a thin cutting wheel
-
tylerb43
- Preferred User
- Posts: 492
- Joined: Fri Nov 14, 2008 2:54 pm
- Location: Union, MO
Re: 1969 Ranger - Project Glory Days!
Hey guys, very interesting discussion, thank you all very much for the different views and expertise. I would have to agree that when butt welding with a MIG, the ideal gap width you want is about .040". So technically, if you're cutting with a .040" thick blade, it may work out. (on a flat piece) But if you apply that logic to a cab corner, you can't just simply lay the new over the old and cut them together because of the complexity of the shape. Which I believe is what Randy cautioned to in the first place.
Of all the patch panels I've done on this thing - and there's been quite a few, but I still consider myself a complete novice compared to some of you guys - I've never cut old and new at the same time, I've used the method of laying the new over the cutout and marking the cut line. And when I cut, I "keep the line". Then there's a lot of fitting-trimming-fitting-trimming. I figure it's better to have a little too much metal and trim down to your .040" gap, then try to weld a .125" gap. But that's how I get the best fit, time and patience, there's no way I see to sprint to the finish line with one cut and done. Just my
I got RH side welded in! It came out pretty decent considering it's my first attempt at a cab corner. The 5" section just inboard of the vertical intention didn't turn out the best. I guess it'll be hidden by the bed, so I shouldn't worry about it too much, but it'll bother me for a bit. What do you guys think?
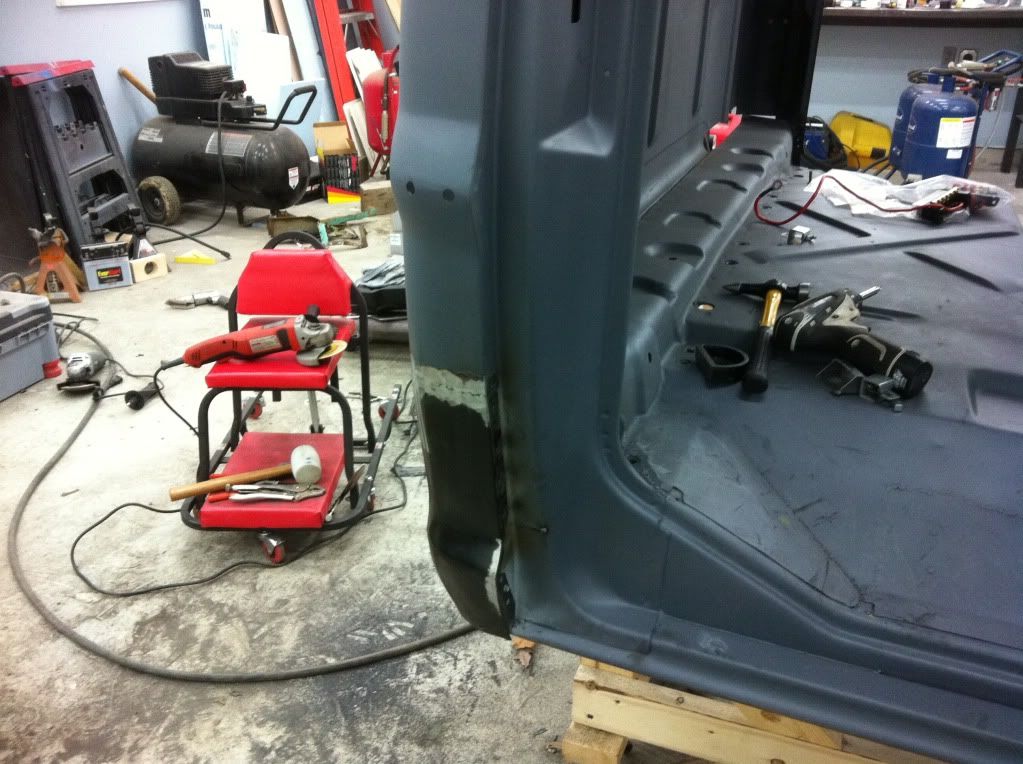
Here's a little trick I used to mark the body line so I could line up the new corner. Worked great!

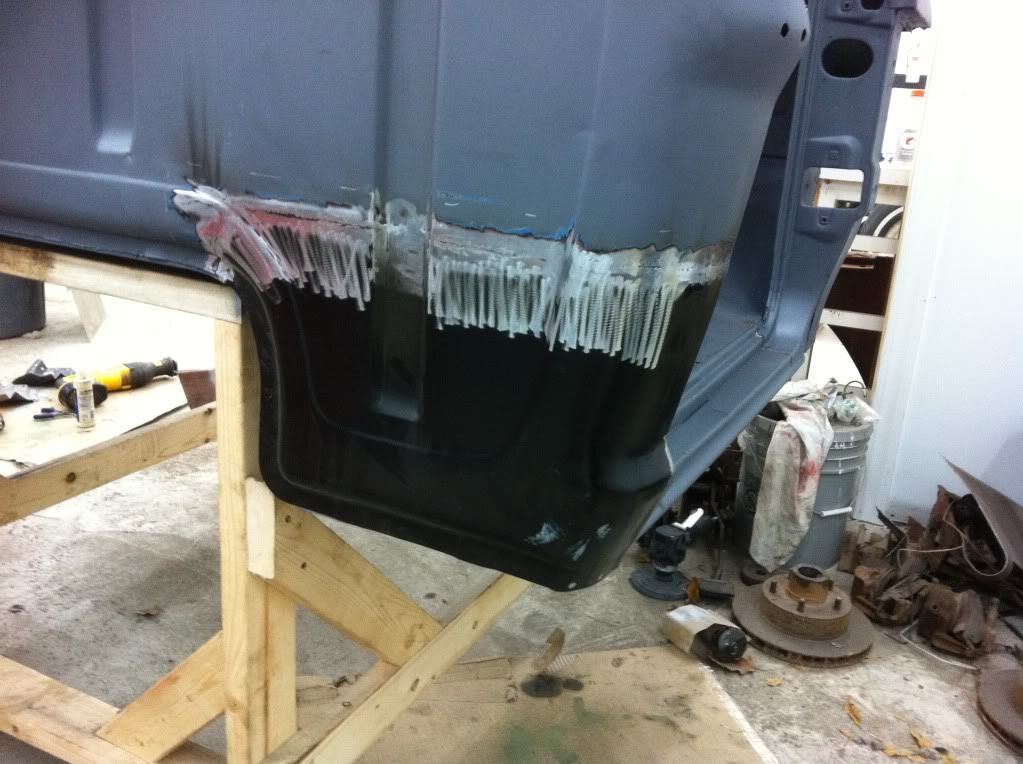
I gotta say this about these (and all) patch panels. You can't expect them to be perfect. I'm an engineer, things in my world are either dead-on or it's wrong. I've found that if I carry that expectation over into my "hobby world", I will be completely disappointed. Auto body is kinda like carpentry, it'll work if it's close, and there's always a way to hide a mistake. There's no way to measure anything down to the thousandths of an inch. And welding, hammering, grinding can change things greatly. Panels are more located by sight and feel as opposed to a precise measurement. These are Dennis Carpenter patches, supposed to be the best, but they just aren't perfect, so don't expect it. It's been said before and I now totally agree, the best patch panel you can get is one carefully cut from a solid junkyard donor. Unfortunately, not many of us have access to such a thing, so we make due with "the best" available to us.
Of all the patch panels I've done on this thing - and there's been quite a few, but I still consider myself a complete novice compared to some of you guys - I've never cut old and new at the same time, I've used the method of laying the new over the cutout and marking the cut line. And when I cut, I "keep the line". Then there's a lot of fitting-trimming-fitting-trimming. I figure it's better to have a little too much metal and trim down to your .040" gap, then try to weld a .125" gap. But that's how I get the best fit, time and patience, there's no way I see to sprint to the finish line with one cut and done. Just my
I got RH side welded in! It came out pretty decent considering it's my first attempt at a cab corner. The 5" section just inboard of the vertical intention didn't turn out the best. I guess it'll be hidden by the bed, so I shouldn't worry about it too much, but it'll bother me for a bit. What do you guys think?
Here's a little trick I used to mark the body line so I could line up the new corner. Worked great!
I gotta say this about these (and all) patch panels. You can't expect them to be perfect. I'm an engineer, things in my world are either dead-on or it's wrong. I've found that if I carry that expectation over into my "hobby world", I will be completely disappointed. Auto body is kinda like carpentry, it'll work if it's close, and there's always a way to hide a mistake. There's no way to measure anything down to the thousandths of an inch. And welding, hammering, grinding can change things greatly. Panels are more located by sight and feel as opposed to a precise measurement. These are Dennis Carpenter patches, supposed to be the best, but they just aren't perfect, so don't expect it. It's been said before and I now totally agree, the best patch panel you can get is one carefully cut from a solid junkyard donor. Unfortunately, not many of us have access to such a thing, so we make due with "the best" available to us.
Last edited by tylerb43 on Thu Jan 12, 2012 7:42 am, edited 1 time in total.
-
67nukeford
- Blue Oval Fan
- Posts: 589
- Joined: Tue Aug 19, 2008 3:20 pm
- Location: Nebraska, Omaha/Elkhorn
Re: 1969 Ranger - Project Glory Days!
Tyler, looks pretty damn good to me! I'll be hitting you up for advice when I get to this point!!
-
FoPAR

- Preferred User
- Posts: 272
- Joined: Mon Jun 08, 2009 10:08 pm
- Location: Washington
Re: 1969 Ranger - Project Glory Days!
That's why they invented bondo....  looks good from here
"FoPar" because I love Fords and Mopars so just call me FoPar...
-
67mann
- 100% FORDified!
- Posts: 1706
- Joined: Thu Feb 07, 2008 7:19 am
- Location: NY..Mt.Morris 3rdgen. homestead
Re: 1969 Ranger - Project Glory Days!
Nice job Tyler as I said earlier...your Fab skills, have you more than capable to do this Your method for "fitting" is fine and it's what you feel is the right way  There's a millon ways "to skin a cat" and in the end were all just lookin to do the best job we can....the way we see fit.

You'll get no arguement from me on "Brazing"...it's how I orginally learned to do sheet metal repair. Really is a.."lost art" style with all the portable mig's on the market. So we are talking two styles of welding and we'll have to agree to disagree on distortion...Tyler's thread.. not our'selgemcdlf wrote:If you have a heat distribution problem you are way too hot. I learned from an old man who remembered when they came out with the original Bondo. Everything I have read on sheet metal repair remains as he taught all of us. Oxy/Acetelene is the best way to weld sheet metal and minimal gap is best. You should be able to almost weld it together without any rod. Why oxy/acetelene? It is a "soft" weld that can be worked just like sheet metal as opposed or mig or tig which produce much "harder" welds. Use a very small tip and pack the area around with whatever the material is they use nowadays to absorb heat. Back then it was asbestos.67mann wrote: Good point for woodworking......butt welding,you need that gap for heat distortion. Like 69 said.....a thin cutting wheel
I've had enough and I'm not alone
http://s267.photobucket.com/albums/ii304/67mann/
http://s267.photobucket.com/albums/ii304/67mann/