1969 Ranger - Project Glory Days!
Moderator: FORDification
-
tylerb43

- Preferred User

- Posts: 492
- Joined: Fri Nov 14, 2008 2:54 pm
- Location: Union, MO
Re: 1969 Ranger - Project Glory Days!
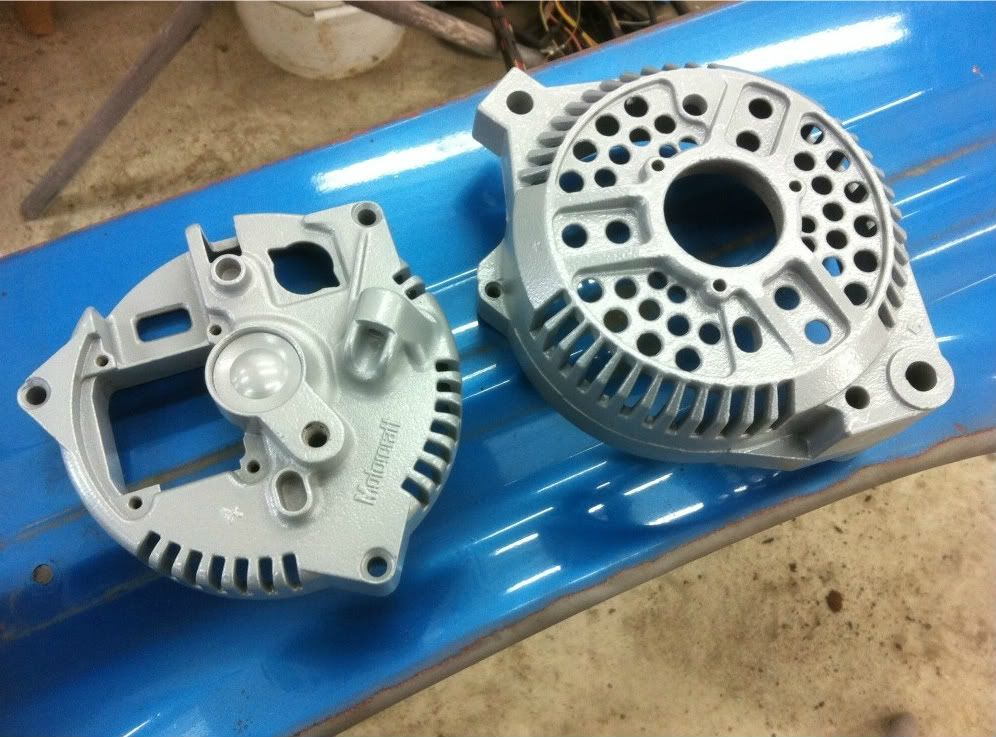
Here's the G3 housing after coating. Small victories boys! 
-
67mann

- 100% FORDified!

- Posts: 1706
- Joined: Thu Feb 07, 2008 7:19 am
- Location: NY..Mt.Morris 3rdgen. homestead
Re: 1969 Ranger - Project Glory Days!
I've had enough and I'm not alone
http://s267.photobucket.com/albums/ii304/67mann/
http://s267.photobucket.com/albums/ii304/67mann/
-
elgemcdlf

- 100% FORDified!
- Posts: 1855
- Joined: Mon Nov 01, 2010 2:04 pm
- Location: Ringgold, GA
Re: 1969 Ranger - Project Glory Days!
I had to chuckle at this one. I bought a pair of very nice fenders for my truck and the first thing I did was cut holes in them. Couldn't figure out how to get the fender scoops without the cut.67mann wrote:...I do however have a set of pristin fenders though....one thing I won't have to weld on
Tyler I am curious as to why you cut the fender apart instead of just having it acid dipped.
-
67nukeford

- Blue Oval Fan

- Posts: 589
- Joined: Tue Aug 19, 2008 3:20 pm
- Location: Nebraska, Omaha/Elkhorn
Re: 1969 Ranger - Project Glory Days!
I was thinking of doing the same to my front fenders Tyler. You'd have to be able to get them ecoated, or something, if you had them dipped, to protect between the fender and the brace. I wish we had someone around here that does acid dipping, I'd like to get my doors done! Nice job on the alternator also!
-
tylerb43
- Preferred User
- Posts: 492
- Joined: Fri Nov 14, 2008 2:54 pm
- Location: Union, MO
Re: 1969 Ranger - Project Glory Days!
I bought this 3G on ebay for $12, I'm going to put in a new rectifier and bearings while I have it apart, but I had it tested and it works fine. And yeah, sure, brag about your awesome fenders, show-off!67mann wrote:nice job on the Alt. Tyler
I was too scared to try that with the (25$) junkyard Alt I bought.....so I cored it for a new One
I do however have a set of pristin fenders though....one thing I won't have to weld on
The red fender wasn't a good candidate for acid dipping, it has rust through in the upper lip that needs a patch. It rusted through the fender surface and the supporting structure, so that area needed to come apart anyway. Most fenders I see around here (and on my 4 trucks) have issues in this area. Plus - the simple fact that there isn't a place around me that does dipping even if I wanted to.elgemcdlf wrote:Tyler I am curious as to why you cut the fender apart instead of just having it acid dipped.
I'm going to patch both pieces, and then use 3M's 8115 Panel Bond to put them back together!
-
tybob81

- Blue Oval Fanatic

- Posts: 840
- Joined: Thu Mar 23, 2006 2:53 am
- Location: Murphysboro IL
- Contact:
Re: 1969 Ranger - Project Glory Days!
ACP Metal Cleaning in Milstadt IL is close to you. I use him.
1968 swb hydroboost, ididit tilt column, Saginaw p/s pump with F series serpentine, all led lights, Vintage Air and painless wiring. 393w, tko600. CV front suspension w/c5 calipers and gt500 rotors. Stock Flexomatic leaf springs with 01 CV 8.8, 3.90 gears and Auburn locker. Custom wood bed floor. Full frame off resto-mod.
-
tylerb43
- Preferred User
- Posts: 492
- Joined: Fri Nov 14, 2008 2:54 pm
- Location: Union, MO
Re: 1969 Ranger - Project Glory Days!
Thanks man!tybob81 wrote:ACP Metal Cleaning in Milstadt IL is close to you. I use him.
-
tylerb43
- Preferred User
- Posts: 492
- Joined: Fri Nov 14, 2008 2:54 pm
- Location: Union, MO
Re: 1969 Ranger - Project Glory Days!
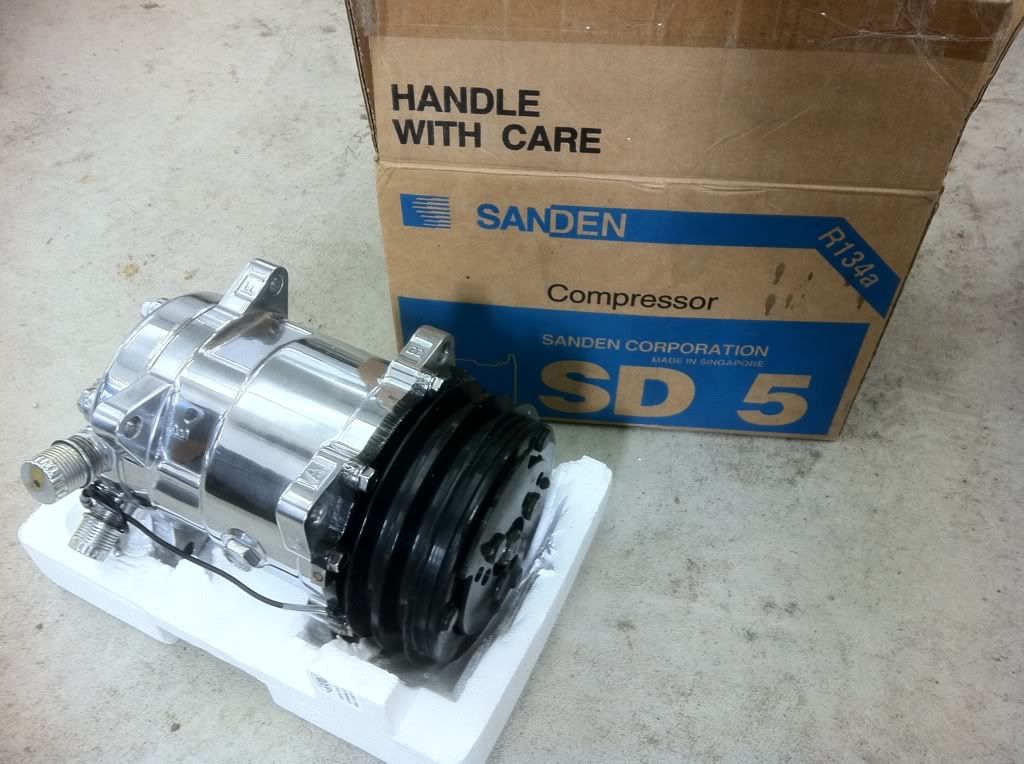
New toy arrived! I'm going to make a bracket to mount this below the new alternator.
-
67nukeford
- Blue Oval Fan
- Posts: 589
- Joined: Tue Aug 19, 2008 3:20 pm
- Location: Nebraska, Omaha/Elkhorn
Re: 1969 Ranger - Project Glory Days!
Ooooo....That's Purdy!!
-
tylerb43
- Preferred User
- Posts: 492
- Joined: Fri Nov 14, 2008 2:54 pm
- Location: Union, MO
Re: 1969 Ranger - Project Glory Days!
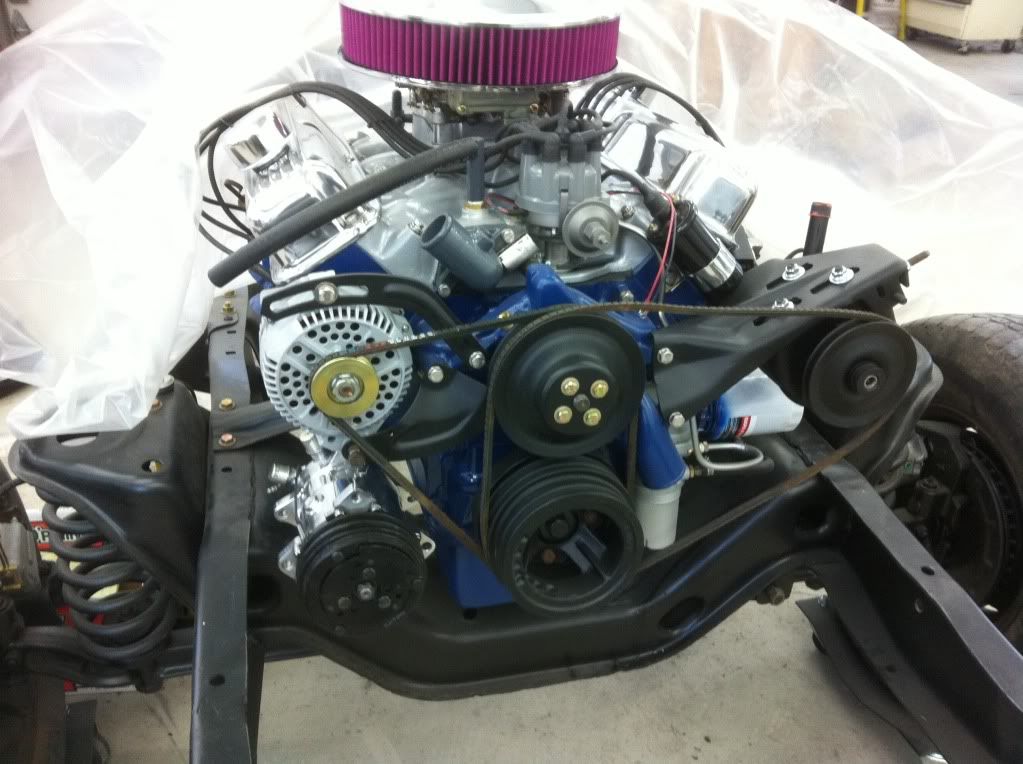
I finally got the "new" rebuilt 3G back together and mounted on the engine. Looks pretty sweet I think!
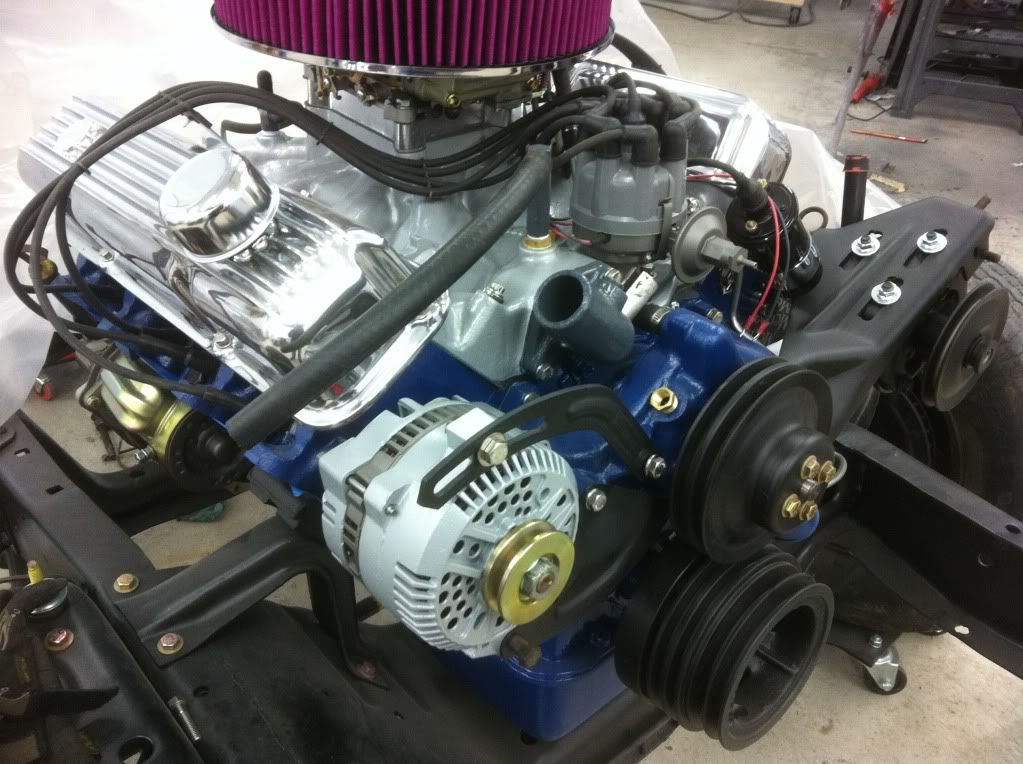
Here's my A/C compressor temporarily hanging in place so I can get some measurements for the new bracket. Basically the lower alt bracket will be replaced with one with mounting provisions for the compressor. As you can see, I have a 4 groove pulley on the crank, so I'll be running three belts. The two shown here (old ones for mock-up only) and a small 3rd for the compressor. I guess I could use 2 for the compressor, but I really don't see the need.
Here's my A/C compressor temporarily hanging in place so I can get some measurements for the new bracket. Basically the lower alt bracket will be replaced with one with mounting provisions for the compressor. As you can see, I have a 4 groove pulley on the crank, so I'll be running three belts. The two shown here (old ones for mock-up only) and a small 3rd for the compressor. I guess I could use 2 for the compressor, but I really don't see the need.
-
ford4x4fun

- Blue Oval Guru

- Posts: 1468
- Joined: Sun Dec 02, 2007 8:38 pm
- Location: Cadiz, KY
- Contact:
Re: 1969 Ranger - Project Glory Days!
You can come show me how to make my motor look that clean any day! Although I am not complaining about mine cause for the first one it is looking good. But man yours is awesome!
CNR Radio Instructor
US ARMY Retired
1971 Ford F100 4x4 (390)
2015 Ford F250 Crew Cab 6.7l
US ARMY Retired
1971 Ford F100 4x4 (390)
2015 Ford F250 Crew Cab 6.7l
-
67nukeford
- Blue Oval Fan
- Posts: 589
- Joined: Tue Aug 19, 2008 3:20 pm
- Location: Nebraska, Omaha/Elkhorn
Re: 1969 Ranger - Project Glory Days!
Engine looks great Tyler!!
-
FoPAR

- Preferred User
- Posts: 272
- Joined: Mon Jun 08, 2009 10:08 pm
- Location: Washington
Re: 1969 Ranger - Project Glory Days!
Great work Tyler, looks awesome
"FoPar" because I love Fords and Mopars so just call me FoPar... 
-
67mann
- 100% FORDified!
- Posts: 1706
- Joined: Thu Feb 07, 2008 7:19 am
- Location: NY..Mt.Morris 3rdgen. homestead
Re: 1969 Ranger - Project Glory Days!
I've had enough and I'm not alone
http://s267.photobucket.com/albums/ii304/67mann/
http://s267.photobucket.com/albums/ii304/67mann/
-
tylerb43
- Preferred User
- Posts: 492
- Joined: Fri Nov 14, 2008 2:54 pm
- Location: Union, MO
Re: 1969 Ranger - Project Glory Days!
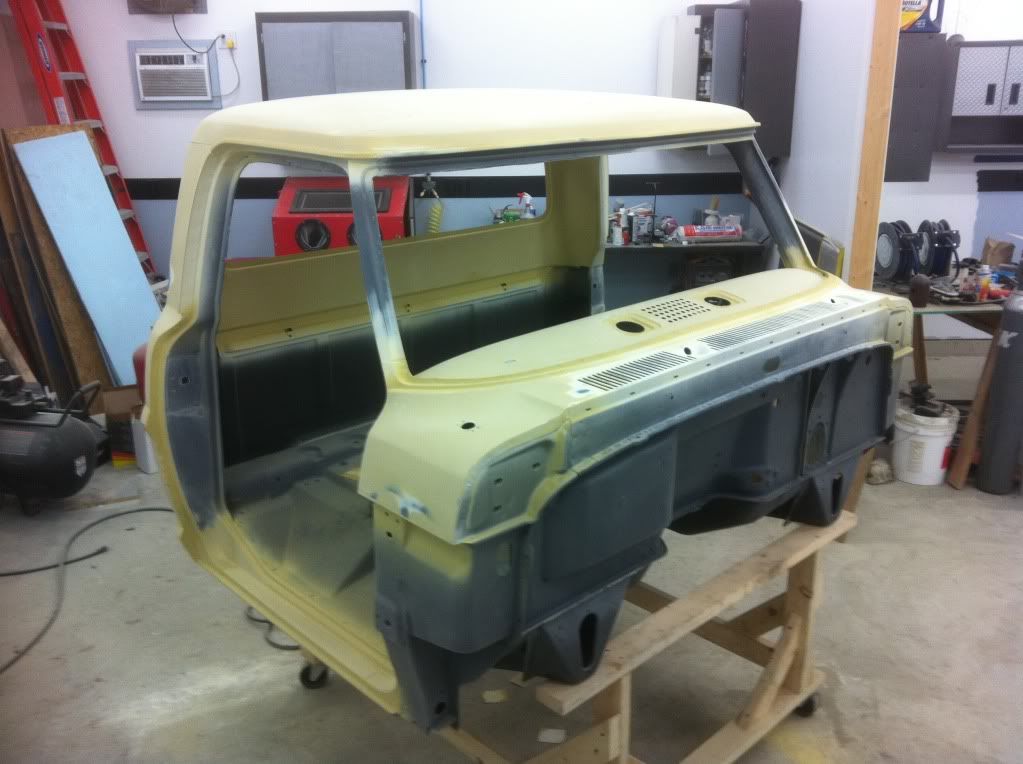
Thanks guys! I'm very happy with how the engine is shaping up, but I've got to keep it wrapped up pretty tight to keep it clean lately. I'm laying down some 2K urethane primer on the cab and blocking the crap out of it. My fingerprints are seriously gone, and I'm so, so sick of sanding.
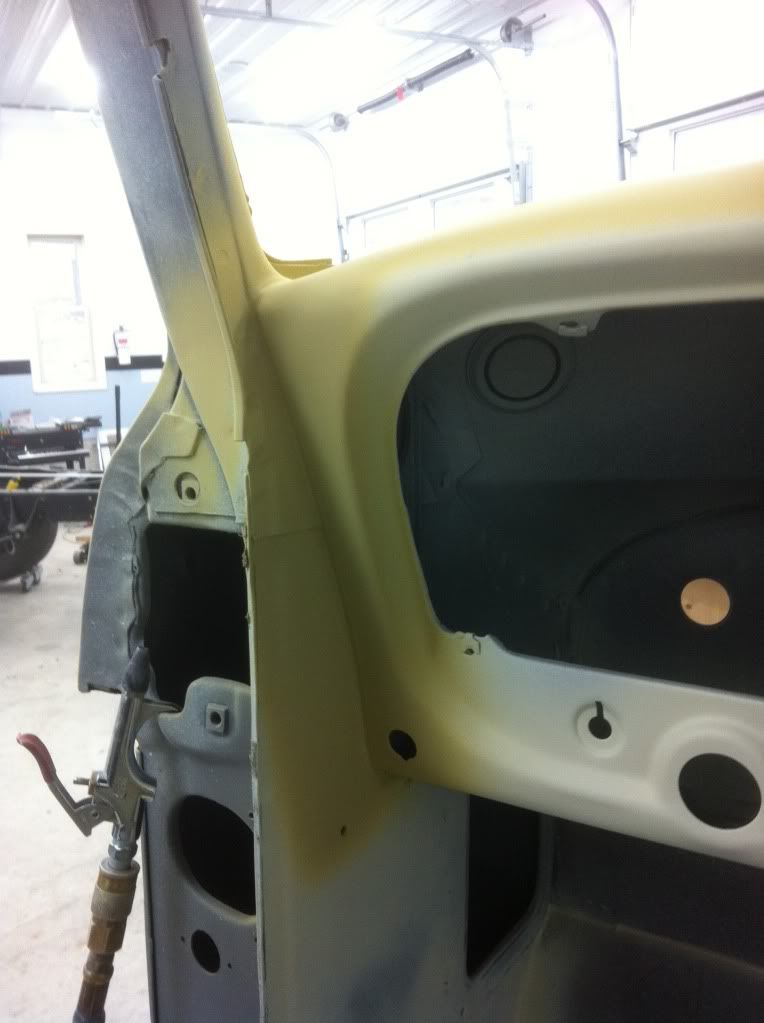
Besides that, I'm pretty happy with how it's turned out. I've got some baby smooth surfaces where not too long ago there was no metal at all, or welded in patches. I'm confident I've got a solid cab again. I opened up every closed cavity on this thing, blasted, and treated everything from the inside out. Which hopefully will provide decades of worry free ownership. Especially since this truck is headed for a very pampered, dry, climate controlled life.
I'm really looking forward to seeing some pretty blue paint on it, especially the dash, which needed quite a bit of attention to make perfect. (well, my "perfect" anyway)
Check it out!
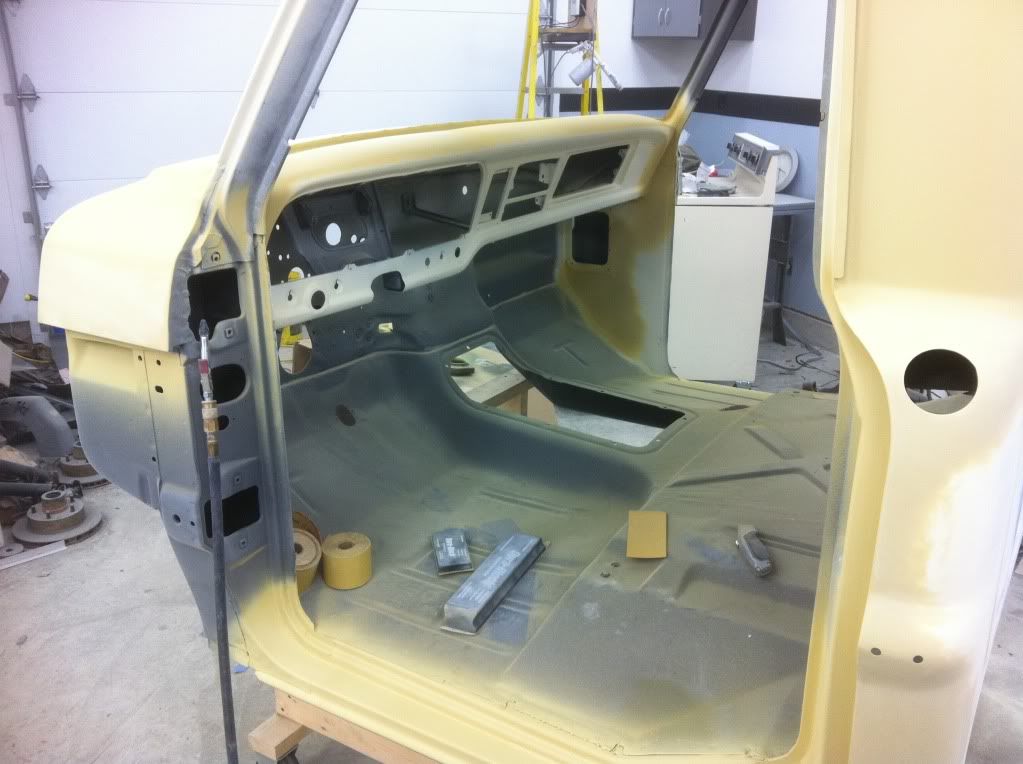
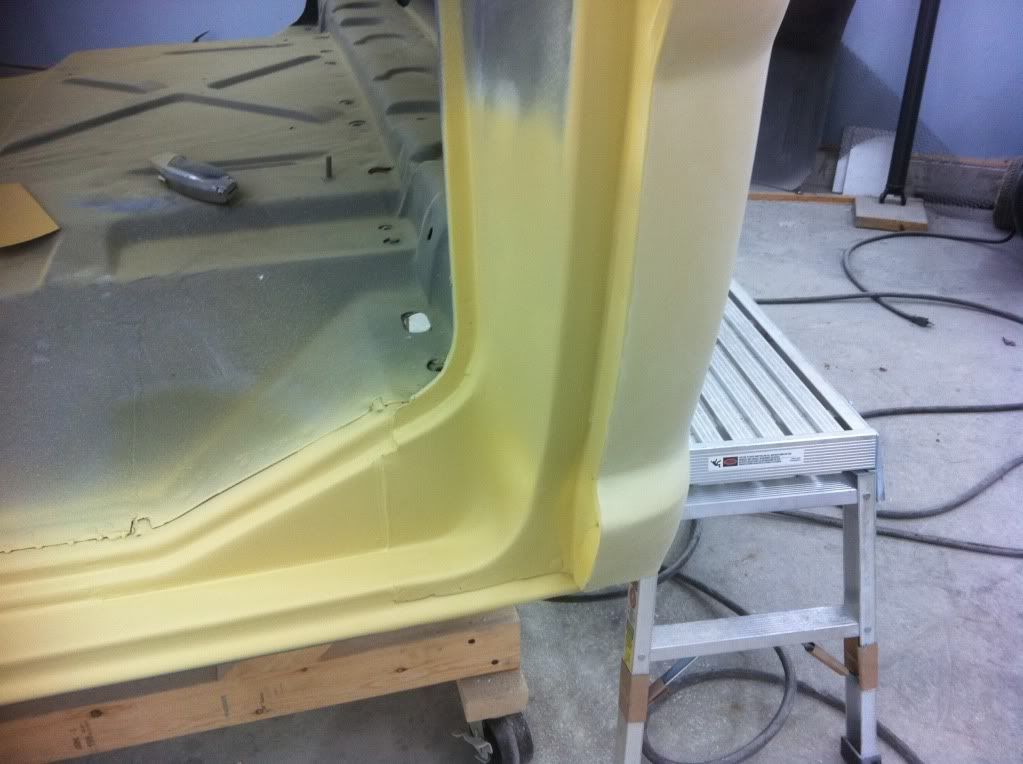
You'll notice I added seam sealer in this seam between the dash and the A-pillar, I think it'll look better than a "black line" gap after it's painted. I guess we'll find out!
Besides that, I'm pretty happy with how it's turned out. I've got some baby smooth surfaces where not too long ago there was no metal at all, or welded in patches. I'm confident I've got a solid cab again. I opened up every closed cavity on this thing, blasted, and treated everything from the inside out. Which hopefully will provide decades of worry free ownership. Especially since this truck is headed for a very pampered, dry, climate controlled life.
I'm really looking forward to seeing some pretty blue paint on it, especially the dash, which needed quite a bit of attention to make perfect. (well, my "perfect" anyway)
Check it out!
You'll notice I added seam sealer in this seam between the dash and the A-pillar, I think it'll look better than a "black line" gap after it's painted. I guess we'll find out!