1967 F100 Father and Son Project - Starting Final Assembly
Moderator: FORDification
-
jrreed1634
- New Member

- Posts: 103
- Joined: Sat Jan 22, 2011 3:29 pm
- Location: Hudsonville, MI
Re: 1967 F100 Father and Son Project (in progress)
The pedals are back from Steve. He did a great job and turned them around in a day. Definitely suggest this upgrade to anyone.

-
jrreed1634
- New Member

- Posts: 103
- Joined: Sat Jan 22, 2011 3:29 pm
- Location: Hudsonville, MI
Re: 1967 F100 Father and Son Project (in progress)
It has been awhile since I posted last and I don't have pictures yet but I wanted to updated on our progress.
My Dad just dropped off the bed, hood and one door at the blaster this week. The truck is still in Lansing, MI and I live in Madison, WI currently. The plan is to go to Lansing in a couple weeks after the parts are back from getting blasted. We need to do all of the metal work on the bed fixing rust and then we are going to paint the bottom with POR-15 and apply a roll on bed liner.
We also have plans to install this tank from Jaz products under the bed.
http://www.summitracing.com/parts/JZP-204-016-01/
My Dad is getting a machined ring made to mount the chrome flip door in the bed above the tank. Looking forward to working on it for a long weekend and getting it closer to being painted!
-
jrreed1634
- New Member

- Posts: 103
- Joined: Sat Jan 22, 2011 3:29 pm
- Location: Hudsonville, MI
Re: 1967 F100 Father and Son Project (in progress)
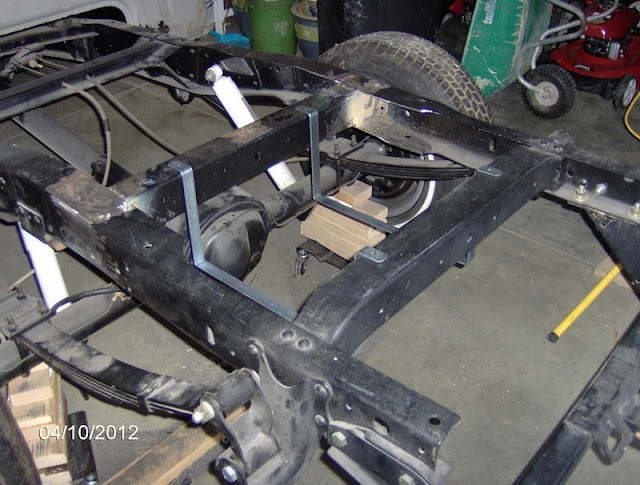
My Dad got the fuel cell installation started. We kept the rear most frame rail in place and moved the next one toward the front of the truck about an inch. He also flipped it over to get more clearance for the tank mounting bracket. Here are a couple of pictures of the bracket in place. Next week we will get the fuel cell in place and then mount the flip door in the bed floor. More pictures to come soon....


- elgemcdlf
- 100% FORDified!

- Posts: 1855
- Joined: Mon Nov 01, 2010 2:04 pm
- Location: Ringgold, GA
Re: 1967 F100 Father and Son Project (in progress)
You may want to rethink your mounting. With what I see you have no way to drop the tank without pulling the bed. I would shorten the straps and bolt them to the bottom of the crossmembers.
-
jrreed1634
- New Member

- Posts: 103
- Joined: Sat Jan 22, 2011 3:29 pm
- Location: Hudsonville, MI
Re: 1967 F100 Father and Son Project (in progress)
Thanks for the heads up. We did exactly what you said and it actually works out nice because of the extra clearance above the tank. The straps are attached to the bottom of the frame rail. I will post some pictures this weekend.
-
jrreed1634
- New Member

- Posts: 103
- Joined: Sat Jan 22, 2011 3:29 pm
- Location: Hudsonville, MI
Re: 1967 F100 Father and Son Project (in progress)
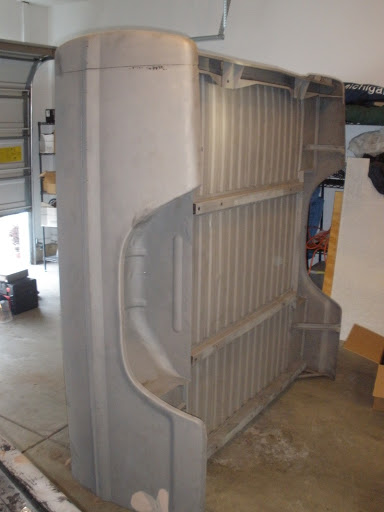
Just got back from a long weekend of working on the truck in Michigan. My Dad got the hood and bed blasted and picked it up before I got there. We started by doing all of the metal work on the bed patching some bad areas of rust. The fuel cell was mounted between the frame rail. We cut a hole in the bed floor and welded in a steel ring to mount the chrome fuel door. The hood had a few areas of rust repaired and then was painted with POR-15 underneath. The bottom of the bed and top were also painted. The inside of the bed will get a bed liner after the truck is painted. The hood latch and upper valance were installed. We also got a new radiator and installed it along with the hoses. Here are the pictures.
The bed after being blasted.

Rust in the corners.

Some rust on the outside. We fixed these areas and filled all of the holes for the trim.

Cut out bad areas.

Patches installed and ring for fuel door welded in place. As you can probably tell the bed is still pretty rough and does not look perfect. This is no show truck, our goal was to stop and protect from rust. Hopefully the bedliner will cover up some of the imperfections.

We had to cut one of the cross member and the reinforced it with a piece of steel angle.

All painted.

Fuel cell going in place. We modified the mounting straps to attach to the bottom of the frame rail so we can still drop the tank with the bed on the frame.


Hood latch points.

New radiator.

Hood and front end.

Bed.

Fuel Door.

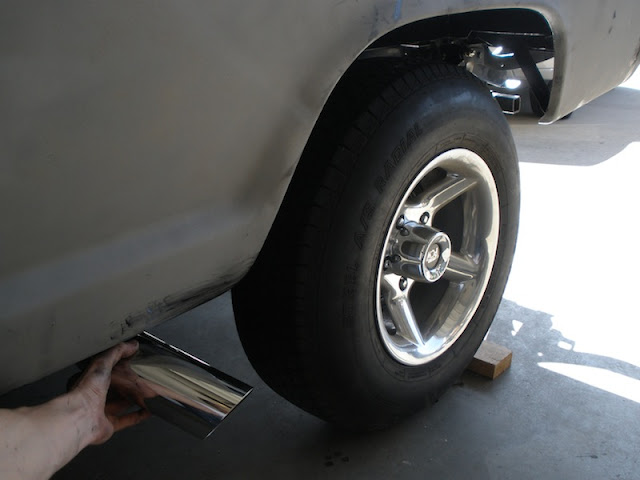
Planning for the exhaust.

End of the weekend.

Next step is to get the exterior painted.
The bed after being blasted.
Rust in the corners.
Some rust on the outside. We fixed these areas and filled all of the holes for the trim.
Cut out bad areas.
Patches installed and ring for fuel door welded in place. As you can probably tell the bed is still pretty rough and does not look perfect. This is no show truck, our goal was to stop and protect from rust. Hopefully the bedliner will cover up some of the imperfections.
We had to cut one of the cross member and the reinforced it with a piece of steel angle.
All painted.
Fuel cell going in place. We modified the mounting straps to attach to the bottom of the frame rail so we can still drop the tank with the bed on the frame.
Hood latch points.
New radiator.
Hood and front end.
Bed.
Fuel Door.
Planning for the exhaust.
End of the weekend.
Next step is to get the exterior painted.
- elgemcdlf
- 100% FORDified!

- Posts: 1855
- Joined: Mon Nov 01, 2010 2:04 pm
- Location: Ringgold, GA
Re: 1967 F100 Father and Son Project (in progress)
Ok you are probably going to shoot me but did you weld the bolts in for the tank straps? If not how do you plan on getting a wrench on the top to drop the tank with the bed on? You have some options in this area. Weld nuts into the crossmember or weld bolts to the crossmember. Personally I would do the nuts. If you strip them out you can tap them larger and use the next size larger bolt. You could also drill them out and install heli-coils if they stripped out. You could also just burn them out after you drop the tank and replace with new.
-
jrreed1634
- New Member

- Posts: 103
- Joined: Sat Jan 22, 2011 3:29 pm
- Location: Hudsonville, MI
Re: 1967 F100 Father and Son Project (in progress)
Raining on our parade...just kidding. We did actually think of this during the install. The tank doesn't fill up the entire width of the frame so one thought was that you might be able to reach up there still to get a wrench on it. We didn't actually check this after we set the bed on so we will have to see. If we can't then I will probably just weld a nut to the crossmember.
- Ranchero50
- Moderator

- Posts: 5799
- Joined: Wed Nov 08, 2006 7:02 pm
- Location: Maryland, Hagerstown
- Contact:
Re: 1967 F100 Father and Son Project (in progress)
Looks good. The best advice you can ever get on these builds is plan everything around getting parts in the middle of nowhere and keeping it simple enough you can fix it with a couple basic tools.
'70 F-350 CS Cummins 6BT 10klb truck 64k mile Bahama Blue
Contact me for CNC Dome Lamp Bezels and Ash Tray pulls.
Contact me for CNC Dome Lamp Bezels and Ash Tray pulls.
- shango
- New Member

- Posts: 13
- Joined: Fri Nov 06, 2009 1:38 pm
- Location: Tucson AZ.
Re: 1967 F100 Father and Son Project (in progress)
Sweet 67!
1967 F100 Long bed/352cid/ Warner T-18 4-Speed
- sport71
- Blue Oval Fan

- Posts: 560
- Joined: Sun Oct 02, 2005 6:17 pm
- Location: Texas, Mission
Re: 1967 F100 Father and Son Project (in progress)
Looking good. 
Those who do not learn the lessons of history, are doomed to repeat it.
-
jrreed1634
- New Member

- Posts: 103
- Joined: Sat Jan 22, 2011 3:29 pm
- Location: Hudsonville, MI
Re: 1967 F100 Father and Son Project (in progress)
Thanks everyone for the comments. Here are a view more pictures of things we have been working on lately.
My Dad cleaned up the distributor and started polishing it. Next step is installing the PerTronix upgrade.


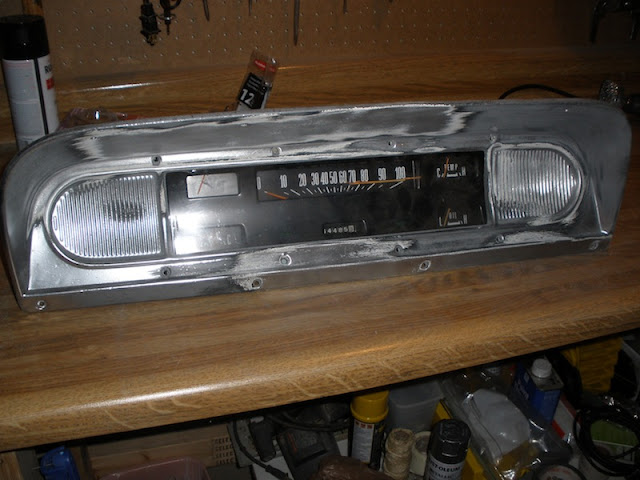
I have been working on the instrument cluster as well. I had tried painting the metal piece that surrounds the gauges before but didn't like how it turned out. You can see in the picture I started removing the paint off again. Now I am trying to decide whether to leave it with the paint stripped off as a brushed metal look and clear over it or just paint it black.


I purchased a white face gauge kit from http://www.whitegauges.net/ as well as paint for the needles and LED bulbs. The bulbs did not fit correctly though even though it was the correct bulb type so I sent them back for some 'glow wire'. I am going to wrap this around for backlighting, should be getting it this week. Here is how it turned out so far.


My Dad cleaned up the distributor and started polishing it. Next step is installing the PerTronix upgrade.


I have been working on the instrument cluster as well. I had tried painting the metal piece that surrounds the gauges before but didn't like how it turned out. You can see in the picture I started removing the paint off again. Now I am trying to decide whether to leave it with the paint stripped off as a brushed metal look and clear over it or just paint it black.
I purchased a white face gauge kit from http://www.whitegauges.net/ as well as paint for the needles and LED bulbs. The bulbs did not fit correctly though even though it was the correct bulb type so I sent them back for some 'glow wire'. I am going to wrap this around for backlighting, should be getting it this week. Here is how it turned out so far.
-
19ford71
- New Member

- Posts: 108
- Joined: Sun Jun 28, 2009 7:34 am
- Location: Fennville, MI
Re: 1967 F100 Father and Son Project (in progress)
What is the black stuff smeared in the seams and around the door driprail?
1971 F-250 360 ci automatic trans - sold
Currently working on a 1969 F100
Currently working on a 1969 F100
-
jrreed1634
- New Member

- Posts: 103
- Joined: Sat Jan 22, 2011 3:29 pm
- Location: Hudsonville, MI
Re: 1967 F100 Father and Son Project (in progress)
It is just more POR-15. It had not rusted through anywhere on the bed seam but after it was blasted we wanted to protect that area from any further rust. We basically put it where there was any potential for rust - under the bed, inside the fenders, inside the doors, bottom of tailgate, drip rails, bottom of cab, inner fenders, underside of hood and bed seams. POR-15 is UV sensitive so must be top coated which most of it will be covered by body work and paint or is not seen by the sun at all.
-
Just Passing Thru
- New Member

- Posts: 4
- Joined: Sat Jun 09, 2012 12:29 am
- Location: SE Arizona
Re: 1967 F100 Father and Son Project (in progress)
The white BG in the gauges looks great, thanks for posting the link.
jrreed1634 wrote:Thanks everyone for the comments. Here are a view more pictures of things we have been working on lately.
My Dad cleaned up the distributor and started polishing it. Next step is installing the PerTronix upgrade.
[ Image ]
[ Image ]
[ Image ]
I have been working on the instrument cluster as well. I had tried painting the metal piece that surrounds the gauges before but didn't like how it turned out. You can see in the picture I started removing the paint off again. Now I am trying to decide whether to leave it with the paint stripped off as a brushed metal look and clear over it or just paint it black.
[ Image ]
[ Image ]
I purchased a white face gauge kit from http://www.whitegauges.net/ as well as paint for the needles and LED bulbs. The bulbs did not fit correctly though even though it was the correct bulb type so I sent them back for some 'glow wire'. I am going to wrap this around for backlighting, should be getting it this week. Here is how it turned out so far.
[ Image ]
[ Image ]
[ Image ]
[ Image ]
1972 F100 SWB
First name is Guy
First name is Guy