My truck has been starting hard lately. I popped the hood and jiggled the coil wire and it started. Then I remembered I have not replaced the coil wire and spark plugs wires since I got it in 2012.
Bought a set yesterday and since it was 64 degrees on Christmas Eve I decided to put them on today.
So there I was in a shortsleeve T-shirt on Christmas Eve in Central PA replacing plug wires!
It started right up with just a turn of the key! Should done this a long time ago!
What did you do to YOUR bump today?
Moderator: FORDification
-
abe

- New Member

- Posts: 223
- Joined: Mon Sep 24, 2012 8:51 pm
- Location: North Central PA
Re: What did you do to YOUR bump today?
1970 F-350 flatbed dump, purchased 9/20/12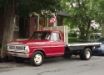
1954 F-100 bought from Grandpa in 1977 for $200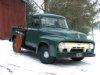
1954 F-100 bought from Grandpa in 1977 for $200
-
spacecadet
- New Member
- Posts: 29
- Joined: Wed Jul 29, 2015 1:36 pm
Re: What did you do to YOUR bump today?
New upper/lower radiator hoses and new PCV intake filter.

1968 F250 / 360 / C6
-
Jacksdad

- Blue Oval Fan

- Posts: 579
- Joined: Sat Mar 30, 2013 8:52 pm
- Location: San Diego, CA
Re: What did you do to YOUR bump today?
Finally got tired of constantly charging a battery that doesn't want to hold a charge and sprung for a new 700 CCA one. Between the new starter and fuel pump, and the rebuilt 2bbl, she's starting like a charm now - although cold starts are fun with the manual choke cable not connected yet. I'm planning on using one I scored at the wrecking yard from a 1959 Edsel (I couldn't leave without scavenging something, and the grille was already missing) but the bezel is angled so it'll take a little tweaking to make it fit the dash.
1971 DRW F350 cab and chassis with an Open Road motorhome conversion, Dana 70, 352 (originally 390)/C6, PS, power front discs, and 159" w/b.
-
abe
- New Member
- Posts: 223
- Joined: Mon Sep 24, 2012 8:51 pm
- Location: North Central PA
Re: What did you do to YOUR bump today?
You have cold starts in Dan Diego?
I wish I had a manual choke rather than my choke on my 70 F-350.
How do you get those automatic chokes to work right anyhow?
I wish I had a manual choke rather than my choke on my 70 F-350.
How do you get those automatic chokes to work right anyhow?
1970 F-350 flatbed dump, purchased 9/20/12
1954 F-100 bought from Grandpa in 1977 for $200
1954 F-100 bought from Grandpa in 1977 for $200
-
Ranchero50

- Moderator

- Posts: 5799
- Joined: Wed Nov 08, 2006 7:02 pm
- Location: Maryland, Hagerstown
- Contact:
Re: What did you do to YOUR bump today?
Make sure the choke stove to the exhaust manifold is working correctly. I've been know to wrap some copper tubing around the head pipe and up to the choke port. Makes a world of difference.abe wrote:You have cold starts in Dan Diego?
I wish I had a manual choke rather than my choke on my 70 F-350.
How do you get those automatic chokes to work right anyhow?
'70 F-350 CS Cummins 6BT 10klb truck 64k mile Bahama Blue
Contact me for CNC Dome Lamp Bezels and Ash Tray pulls.
Contact me for CNC Dome Lamp Bezels and Ash Tray pulls.
-
Jacksdad
- Blue Oval Fan
- Posts: 579
- Joined: Sat Mar 30, 2013 8:52 pm
- Location: San Diego, CA
Re: What did you do to YOUR bump today?
abe wrote:You have cold starts in Dan Diego?
I wish I had a manual choke rather than my choke on my 70 F-350.
Well, cool enough that I'm constantly having to tap dance on the gas pedal so the accelerator pump will keep it running first thing in the morning
My automatic choke has always been problematic so I ditched it a while ago. Unfortunately I picked a generic kit with a wet noodle bracket and crappy cable that would never fully close the choke when the motor was warm without me pulling the air cleaner, so that's why I'm going with the Edsel assembly this time around (well, that and it looks pretty cool). The part that bolted on to the carb in place of the automatic choke mechanism worked well enough though, so I'll be keeping that.
1971 DRW F350 cab and chassis with an Open Road motorhome conversion, Dana 70, 352 (originally 390)/C6, PS, power front discs, and 159" w/b.
-
Jacksdad
- Blue Oval Fan
- Posts: 579
- Joined: Sat Mar 30, 2013 8:52 pm
- Location: San Diego, CA
Re: What did you do to YOUR bump today?
Pretty good day - I just scored a beautiful gas tank from a '71 F250 at the wrecking yard, and I'm going back on my next day off with a breaker bar to pull some later wheels I saw elsewhere in the yard to replace the last of the lock ring ones I have. The F250's bench seat (which I need) was trashed and the tank was missing the sender unit, but I'm not too worried about that - it was the tank that I really needed right now.
While I was there, I popped the rear window and took some measurements to verify that the opening in my cab is correct. I had to do a lot of welding/sheet metal work above and below the window, and just when I needed to check that the opening was correct all the bumps disappeared from the boneyards (typical). Haven't had a chance to check, but hopefully it's right because it's all welded up now...
Edit - just measured my cab and everything looks good. Phew...
1971 DRW F350 cab and chassis with an Open Road motorhome conversion, Dana 70, 352 (originally 390)/C6, PS, power front discs, and 159" w/b.
-
BadApp13
- New Member
- Posts: 16
- Joined: Tue Dec 01, 2015 10:37 pm
Re: What did you do to YOUR bump today?
Cleaned up the garage so i now have room to work around the truck, changed the plugs and installed a Sunpro tach today. Productive day 


1970 Bump 
-
70short4x4
- New Member
- Posts: 23
- Joined: Sat Jul 25, 2015 9:36 pm
Re: What did you do to YOUR bump today?
How did the tach install go? Got the same one sitting in the garage waiting to be installed.BadApp13 wrote:Cleaned up the garage so i now have room to work around the truck, changed the plugs and installed a Sunpro tach today. Productive day
-
PhilsBumps
- New Member
- Posts: 24
- Joined: Tue Sep 22, 2015 3:23 pm
- Location: Jackson County, Michigan
Re: What did you do to YOUR bump today?
Took hopefully the last trip to my mother-in-law's old house and gathered up everything else I could find that she may need. The old truck ran awesome, but now it's looking pretty filthy again... gonna wait for a dry day above freezing to run up to the car wash... until then she'll be tucked back into the garage. 


Phil
'71 F-100 long bed styleside... 360 auto... the beater!
...Even slow progress is progress.

'71 F-100 long bed styleside... 360 auto... the beater!
...Even slow progress is progress.
-
BadApp13
- New Member
- Posts: 16
- Joined: Tue Dec 01, 2015 10:37 pm
Re: What did you do to YOUR bump today?
Surprisingly easy. Nothing to it!70short4x4 wrote:How did the tach install go? Got the same one sitting in the garage waiting to be installed.BadApp13 wrote:Cleaned up the garage so i now have room to work around the truck, changed the plugs and installed a Sunpro tach today. Productive day
1970 Bump
-
hot-rod

- New Member
- Posts: 68
- Joined: Thu Feb 12, 2015 6:20 am
- Location: south germany
- Contact:
Re: What did you do to YOUR bump today?
Today i started to clean Crusty from a lot of mud, oil, grease and rust 
before: now:
before: now:
You do not have the required permissions to view the files attached to this post.
-
Jacksdad
- Blue Oval Fan
- Posts: 579
- Joined: Sat Mar 30, 2013 8:52 pm
- Location: San Diego, CA
Re: What did you do to YOUR bump today?
Wow, that came out beautiful - especially the chassis
1971 DRW F350 cab and chassis with an Open Road motorhome conversion, Dana 70, 352 (originally 390)/C6, PS, power front discs, and 159" w/b.
-
70short4x4
- New Member
- Posts: 23
- Joined: Sat Jul 25, 2015 9:36 pm
Re: What did you do to YOUR bump today?
Good to hear!BadApp13 wrote:Surprisingly easy. Nothing to it!70short4x4 wrote:How did the tach install go? Got the same one sitting in the garage waiting to be installed.BadApp13 wrote:Cleaned up the garage so i now have room to work around the truck, changed the plugs and installed a Sunpro tach today. Productive day
-
hedz
- Blue Oval Fan
- Posts: 598
- Joined: Sat Jul 30, 2011 5:50 pm
Re: What did you do to YOUR bump today?
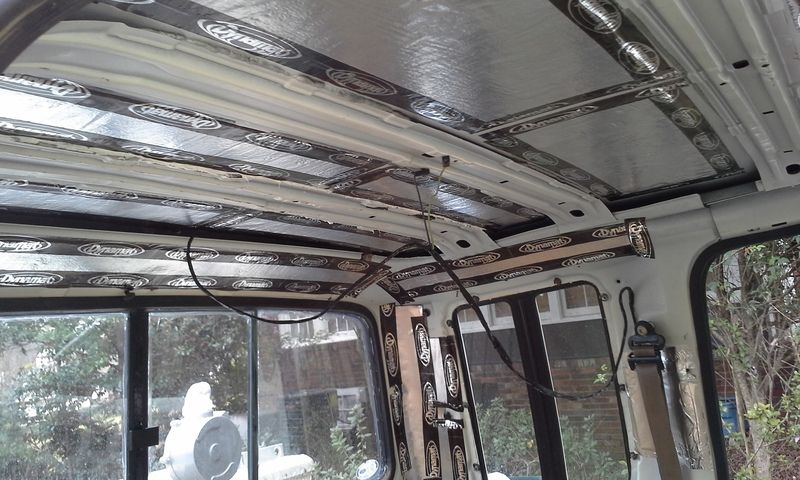
I have been working on my f250 again. it was down for 6 months while i tried to repair the steering column with a discontinued 80 cent part to regain the tilt function. that drove me insane.
so today i hammered out the roof enough to remove the bow because some idiot thought they could stand on it i'm sure... so after i did that i made a wood jig and set a car jack inside the cab and jacked up the farthest rear support brace on the roof and re glued it with some loctite caulking. worked fine. sure it's not 3m seam sealer but i'm not going to spend over 100 dollars to fix one support brace. then i spent all day finishing the sound matt. then i installed the carpet. then i rewashed all my interior parts with a pump sprayer full of hydrogen peroxide baking soda and dish soap. Then i scrubbed with hot water and dish soap and all the parts should be done drying for tomorrow.
Hopefully i can get all my leftover padding from the prius installed on the backs of my interior panels and have the majority of the panels installed tomorrow.
it's been a long time coming! i can't wait to sell this thing!

