Critique My Welding
Moderator: FORDification
-
- Blue Oval Fan
- Posts: 698
- Joined: Fri Apr 01, 2005 6:28 pm
- Location: Oceanside, CA
Critique My Welding
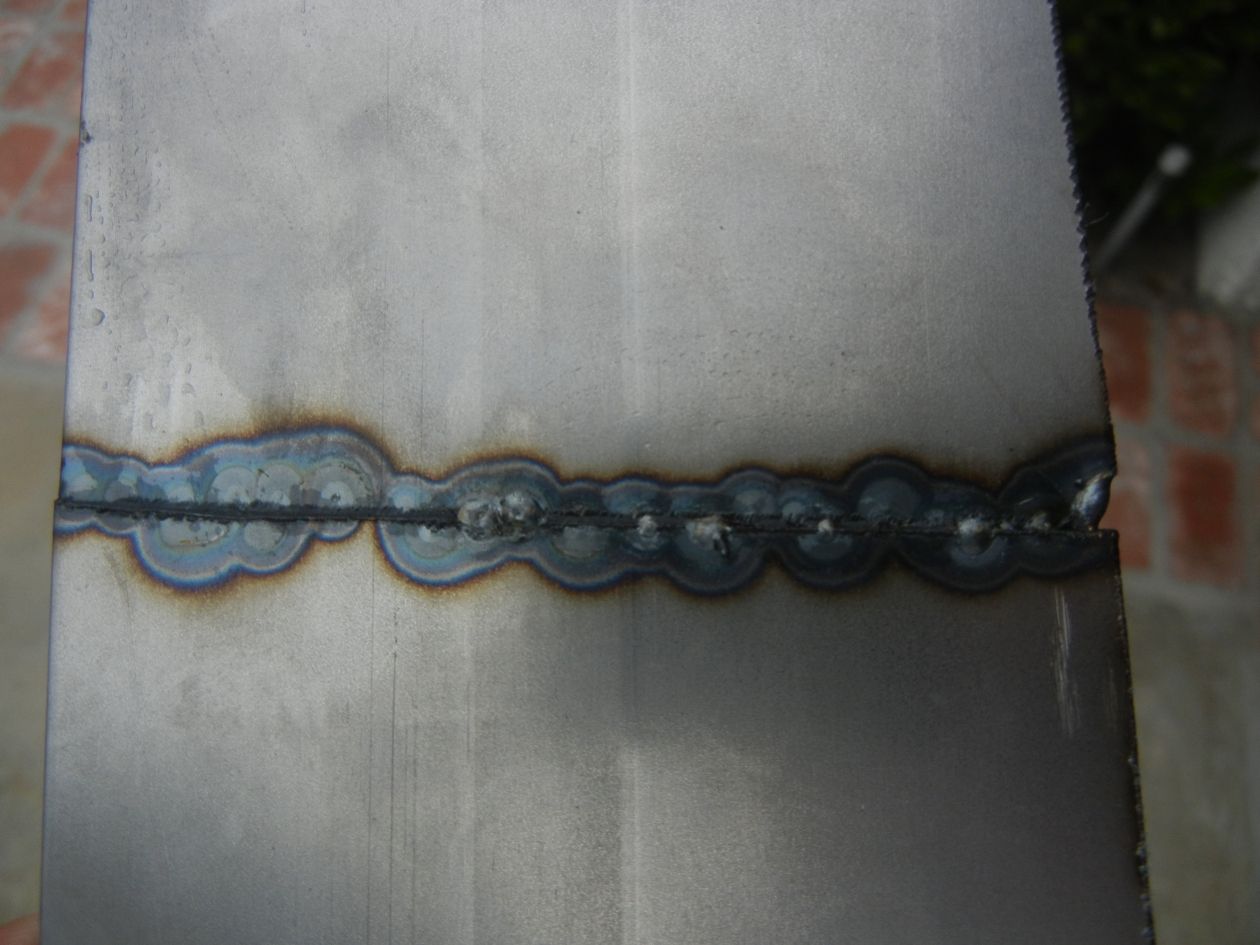
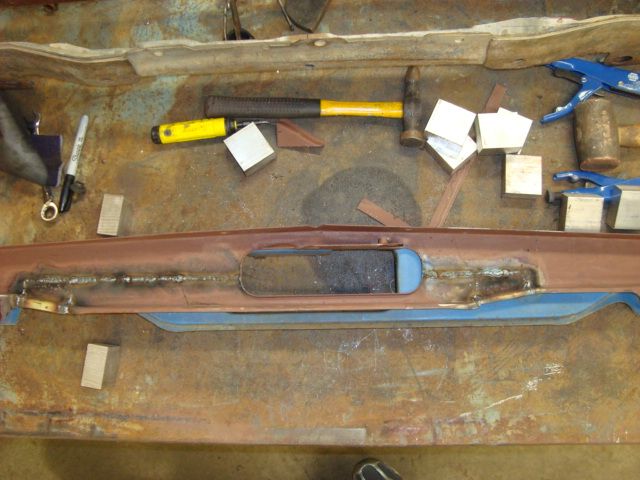
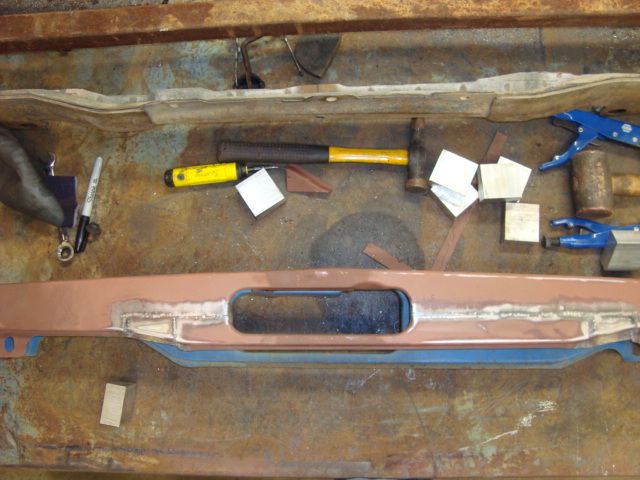
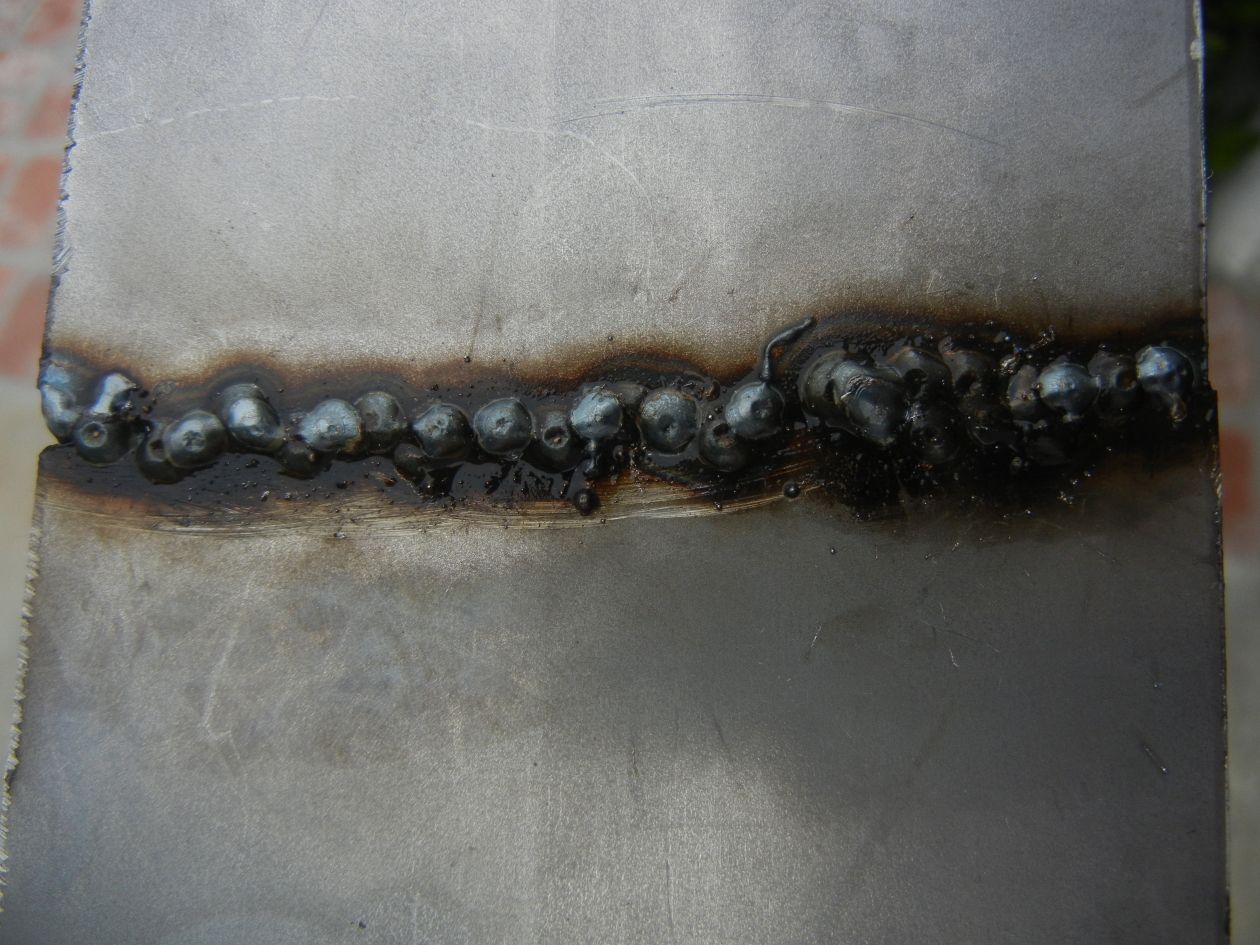
I just got a Hobart Handler 140 and am practicing my welding. This is 16 gauge sheet metal. Please let me know if you have any comments regarding my welding and any improvements I can make. After grinding down the weld flat, I was able to break the weld by flexing the piece back and forth, although it took significant effort and time to do that.
Welded side.
Back Side
Welded side.
Back Side
Re: Critique My Welding
Congrats on your new welder. My welding skills are not the greatest, but maybe I can shed some light.
The weld looks a bit cold and lumpy, not bad for your first weld though. Try slowing your movement of the rod so that you get a smoother, more uniform bead. This will help with the penetration too.
On the reverse side you should be able to see a more noticeable bead coming through, that's the penetration. I see a few spots that came through. Like most of my welds, there is to much or to little penetration.
For sheet metal, start with small tack welds to bond it together first. Otherwise it will warp and change shape. Then you can come back and do a longer bead.
Don't grind the weld when you're done. Chip the slag (I think that's the right term) off with a chipping hammer. Use eye protection to keep the chips out of your eyes!
If you can break the weld by flexing it the weld is weak. A good weld joint will be stronger than the surrounding metal and the prolonged flexing should break the metal near the weld, but not the weld it'self.
When you get into thicker metals, cut the joint in half, crosswise to the weld so you can see the actual penetration.
Good welding skills are all about practice, practice and more practice. Take that metal in the picture and run practice beads across it, maybe 1/4 inch apart. After it's full of beads, compare the last to the first and you will see a difference.
- 71PA_Highboy
- Blue Oval Fanatic
- Posts: 923
- Joined: Tue May 23, 2006 11:32 am
- Location: Denver of the East
Re: Critique My Welding
Hobart Handler 140 is a mig welder.
Looks to me like your feed speed is too high... since you only have a 4 position heat switch, I woudl focus on the feed.
Keep practicing!
Looks to me like your feed speed is too high... since you only have a 4 position heat switch, I woudl focus on the feed.
Keep practicing!
Got Ford?
2 EarlyBroncos (68,69)
2 Classic Mustangs (69,70)
1 F250 4x4 (71) - OB - 360, NP435, D24, HPD60 4.10, D60,
1 94 Ranger, 2.3, 5spd
1 Lincoln Mark VIII
2 EarlyBroncos (68,69)
2 Classic Mustangs (69,70)
1 F250 4x4 (71) - OB - 360, NP435, D24, HPD60 4.10, D60,
1 94 Ranger, 2.3, 5spd
1 Lincoln Mark VIII
- flyboy2610
- 100% FORDified!
- Posts: 4901
- Joined: Sun Oct 03, 2004 6:42 pm
- Location: Nebraska, Lincoln
Re: Critique My Welding
Slow your feed rate down, and slow down your passes. Go ahead and burn up some metal, that's how you learn.
"If the women don't find you handsome, they should at least find you handy."
Red Green
If you're going to live like there's no hell...............
you'd better be right.
http://theworldasiseeit-flyboy2610.blog ... ee-it.html
Red Green
If you're going to live like there's no hell...............
you'd better be right.
http://theworldasiseeit-flyboy2610.blog ... ee-it.html
- 1970 Hi-Boy
- Preferred User
- Posts: 344
- Joined: Thu Mar 08, 2012 2:22 pm
- Location: Middle Tenessee/Northern Wisconsin/wherever else I may roam to try and make a buck.
Re: Critique My Welding
Obviously you're trying to "spot" pass for body panels. Notice the back side where you had the best penetration in a few spots. That's what you want. Try keeping your "aim" a little better centered on the joint, so it looks like a straight line when you are done and I think you'll be fine. Be patient and relax.
1970 F250 Sport Custom 4x4 360 V8, otherwise known as the Hi Boy, and a Harley-Davidson.
1953 Lincoln SA200 portable welder with a 4 cylinder 1941 Continental F162 engine.
"If you think you can do a thing or think you can't do a thing, you're right." Henry Ford
1953 Lincoln SA200 portable welder with a 4 cylinder 1941 Continental F162 engine.
"If you think you can do a thing or think you can't do a thing, you're right." Henry Ford
-
- Blue Oval Fan
- Posts: 698
- Joined: Fri Apr 01, 2005 6:28 pm
- Location: Oceanside, CA
Re: Critique My Welding
Thanks all for the advice, it's very helpful.
Racer Z, why do you say don't grind down the weld?
Re: Critique My Welding
You want to see how the weld looks. You looking primarily for the half circle rings that are created when you have good puddle flow. Chip the slag off with a chipping hammer.dcbullet wrote:Thanks all for the advice, it's very helpful.
Racer Z, why do you say don't grind down the weld?
A well done weld joint is a work of art (in my opinion) and should be proudly displayed. (more arguments to follow) Grinding the weld weakens the weld joint, maybe not much, but weaker. For jobs that require some sort of inspection, grinding is prohibited.
Case in point, roll-bars for race cars. The tech inspector wants and needs to see the weld joints to look for penetration and good puddle flow. He also looks for excessive splatter. Grinding the weld here is written into the rule book as forbidden.
In the future, when you skills are much better, you may be doing a project where you don't want to see any welded joints. This usually gets a double weld; make one weld pass, grind it down and built it back up with weld, then grind it smooth so you can't see a weld joint.
But for now you need to see all of the weld. Look for uniformity, puddle and flow control, small ripples in the bead and penetration.
-
- Blue Oval Guru
- Posts: 1257
- Joined: Sat Jan 08, 2011 6:45 pm
- Location: Comox Valley B.C. Canada
Re: Critique My Welding
not bad for a first try! .....especially since you're trying your skills out on thin ga sheetmetal -its easier to learn on a little heavier gauge material-
the fact that you had to flex your weld repeatedly before breaking it is a sign you're on the right path
- if your weld itself will bend with the material instead of failing it is considered "good"
the next thing i'd try would be using a little more heat -or a little less stick out- and then play connect the dots for awhile
- still got my first first car 20+yrs later : 69 f100 sorta kinda pretending its a Mercury M100 w/a 70 f350 sport custom cab (factory buckets) 67 grille with 69 ranger cooneyes 68 merc box and hood,some supercool fiberglass fenders i scored way back when, 76 f150 disc brake frontend..currently running a 90 5.0HO 4bbl/c4 auto & 3.50 posi...originally a 360/c6 f100 Ranger with dealer added towpack (incl. kelsey hays trailer brake),boxside toolbox,behind the seat stowage & belly tank...only original parts left on 'er are the frame,rear end,rear springs,and rear bumper...
- Ranchero50
- Moderator
- Posts: 5799
- Joined: Wed Nov 08, 2006 7:02 pm
- Location: Maryland, Hagerstown
- Contact:
Re: Critique My Welding
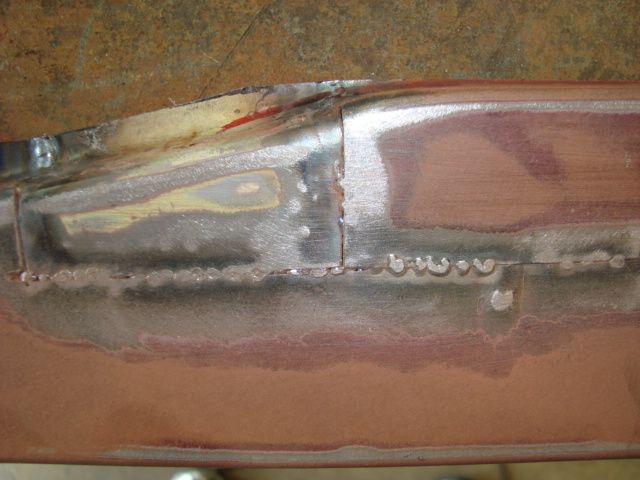
When butt welding, you really need to just hold your gun very steady, blip the trigger a half second to get the first fuse, then in a dragging motion move your gun 1/8 and blip it again. Keep the heat in your bead and just flash it down to you butt so it fuses. Move it 1/8" again and repeat. Depending on what your metal panels do you might be able to pull a 1/4-3/8" bead but it'll heat up and possibly warp if you aren't using a heat sink. By keeping the mass of your weld in the existing bead all you have to do it flapwheel the bead down to the base metal for cleanup.
Again, the trick is to hold your gun steady and also watch the color of the weld so you don't overheat and decarbon it. Wait for the color to almost go dark before hitting it again. Process shoult be 'blip, wait wait wait, blip, wait wait wait blip.
It also pays to blip it every 2-3" to hold the metal in position with clamps.
I run .023" wire for sheetmetal and .030" for everything else.
Top, you can barely see that the weld penetrated through to the top. This was clamped flat to a 3/8" thick steel table top so it acted like a heat sink.
'70 F-350 CS Cummins 6BT 10klb truck 64k mile Bahama Blue
Contact me for CNC Dome Lamp Bezels and Ash Tray pulls.
- Ranchero50
- Moderator
- Posts: 5799
- Joined: Wed Nov 08, 2006 7:02 pm
- Location: Maryland, Hagerstown
- Contact:
Re: Critique My Welding
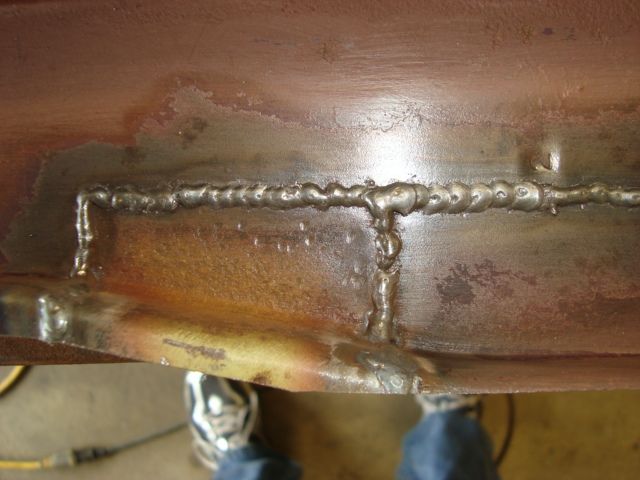
Here's two closeups that show the good and the bad of panel welding. You can compare the top and bottom for results.
The 1" above my left foot welded well, the section above my right foot was too much penetration. The rest wasn't enough.
I'll run a thin pass over the top before cleaning up the bottom and it should sand out smooth.
One last thing, the better you fit the panels the easier it'll weld together. You can use this method to bridge small gaps if you take the time to let the bead go dark before hitting it again. Otherwise it'll decarbon and you'll get the growing blobs...
'70 F-350 CS Cummins 6BT 10klb truck 64k mile Bahama Blue
Contact me for CNC Dome Lamp Bezels and Ash Tray pulls.
- Bob
- Preferred User
- Posts: 275
- Joined: Thu Jan 04, 2007 2:47 pm
- Location: WESTERN PENNSYLVANIA
Re: Critique My Welding
If you don't have it already... get yourself a nice hat with the speed glass in it. The prices of them have come way down. Makes it a lot easier for a novice (like me) to operate not having to keep flipping up the hat to find out where your at. Also don't want to have a light behind your head because it'll make reflections in your glass and make it rougher to see what you're doing.
Also... make sure you wear long sleaves of something like canvass etc. and some good heavy leather gloves. If you've ever had "sunburn" from a welder you'll know what I'm talking about. Welding along thinking you'll just zap a little more or your arm is hidden well enough and next thing you know your arm will be cooked. The heavy gloves will allow you to use your second hand as support for the other and even rest it on the work in some instances, to help you keep on your path. You can lay a piece of heavier steel on top of the parts to slide your support hand down too if the heat gets to be too much. Oh... and Don't wear something like fuzzy flannel unless you enjoy bursting into flames.
Not sure how you were operating but in most positions I find I do a better job feeding into the work rather than dragging it away. It's easier to see what you're laying down and where you're going. Exceptions to that of course like upside downrunning it back at you.
Wondering if you are using a bottle of gas for flux or flux core wire?
Like all have said... practice. It's easier to make pretty beads on heavier gage material but if your intention is to weld up some panels then might as well practice with light. You're gonna want to play with your wire feed and heat... all the while adjusting the speed of your hand/arm.
- BobbyFord
- 100% FORDified!
- Posts: 5372
- Joined: Sun Feb 04, 2007 9:52 am
- Location: Chatsworth, California
Re: Critique My Welding
I do not run a bead on sheet metal. I use short zaps at an inch or so apart to avoid warping then I come back over and fill in the gaps using the same inch apart pattern until the seam is filled in. If you run a continous bead on a flat section of sheet metal warping will occur. The more bead you put down the more metal there will be to grind off later. Penetration without burn-through is key.
-
- Blue Oval Fan
- Posts: 698
- Joined: Fri Apr 01, 2005 6:28 pm
- Location: Oceanside, CA
Re: Critique My Welding
Thanks again all for your advice. This is fun.
Re: Critique My Welding
Keep us updated with new pictures. I want to see some nice beads soon.
- mybros71
- Preferred User
- Posts: 290
- Joined: Tue Jan 27, 2009 11:00 pm
Re: Critique My Welding
I agree with BobbyFord. Do not weld continuously with sheetmetal. You ARE going to need to grind your welds for body work so make sure you get penetration. The penetration comes at a price though, heat. You need to mitigate its effects by spacing out as BobbyFord suggested. I think your spots in the pictures are fantastic.
"Chipping slag" is for arc welding. I would not suggest attempting it with sheetmetal, unless you like doing bodywork. Plus, the "slag" some are referring to will not be presenbt since you are using a shielding gas. Use a wire brush in between spots and if the tip of the wire burns back and carbons up, clip it back with wire cutters. When I weld, a always have a pair of nippers in my off hand. I've developed this habit because it just seems to help with a smooth start, especially with dirty metal or stainless. I end up sweeping hundreds of 1/8 inch pieces of wire up at the end of the day. Kind of wastefull though.
Practice...a lot.
Tony
2006 Mustang GT (Wife's)
1962 Comet Custom (Wife's)
1971 F100 2wd Prerunner Project (Daughter's)
1971 F250 4wd "The Beast" (Son's)
2007 Toyota Tundra 4wd. (Credit Union's)
Seriously, the best truck I've ever owned, without exception.
1962 Comet Custom (Wife's)
1971 F100 2wd Prerunner Project (Daughter's)
1971 F250 4wd "The Beast" (Son's)
2007 Toyota Tundra 4wd. (Credit Union's)
Seriously, the best truck I've ever owned, without exception.